SICP Chapter 1.2, notes and (some) solutions in Clojure
Summary: Review of some parts of Chapter 1.2 of SICP: execution of processes, recursion versus iteration, growth. A few selected exercises.
The previous chapter introduced the elements of programming, the basic building blocks to express ideas by defining procedures. Chapter 1.2 goes one step further by examining what happens if a procedure gets executed. Predicting how a process is going to behave is not an easy task, but as a first step we introduce some typical execution patterns.
Iteration versus recursion
Depending on how a procedure is defined, the generated process can have very different behaviour. One fundamental distinction can be made between iterative and recursive processes.
A recursive process “expands” in memory by building up a chain of deferred evaluations. This kind of process has two phases: first building up the chain by continuously applying the substitution model, until no substitutions are left to be done (“expansion”), and then, in a second phase (“contraction”), applying the operations until the final result is calculated.
(The fact that a recursion expands might be the reason why grasping it can be difficult sometimes).
An iterative process on the other hand, does not “expand”. To calculate the end result, the procedure introduces a parameter (a state) that keeps track of the intermediate results until the calculation is done. An iterative process, therefore, can be stopped anytime and the calculation can be re-started from where it has been left off. That would not be possible with a recursive process, as the expanded state would get lost between restarts.
Recursive procedure != recursive process
One important conclusion is that a recursive procedure does not necessarily generate a recursive process. We can define a recursive procedure (by referencing to itself), but the resulting procedure can still be iterative.
Growth
The first examples in the chapter (e.g. calculation of n!) are processes that grow linear with the size of the argument (e.g. the size of n). Growth is usually measured in space and steps. Space that is required to store each calculation step and steps that are needed until the calculation finishes. The order of growth can be any form like constant, linear, exponential and so on. Another execution pattern is processes that generate a tree recursion. Here, steps equal the number of nodes and space the maximum depth of the tree (the whole branch in the recursion tree needs to be kept in memory for the calculation of the leave).
This chapter deals mostly with growth.
Exercises
Source code and some more solutions can be found in my Github repo1.
1.9 Evaluation of iteration and recursion
Given two procedures that define addition, which one creates a recursive process and which an iterative?
The first procedure:
(defn + [a b]
  (if (= a 0) b
      (inc (+ (dec a) b))))
If we apply the substitution model, we get following steps:
(+ 4 5)
(inc (+ 3 5)
(inc (inc (+ 2 5))
(inc (inc (inc (+ 1 5)))
(inc (inc (inc (inc (+ 0 5))))
(inc (inc (inc (inc 5)))
(inc (inc (inc 6))
(inc (inc 7))
(inc 8)
9
As we can easily see, this is a recursive process that expands and contracts.
The second procedure:
(defn + [a b]
  (if (= a 0) b
    (+ (dec a) (inc b))))
The process looks like this:
(++ 4 5)
(++ 3 6)
(++ 2 7)
(++ 1 8)
(++ 0 9)
9
An iterative process that keeps a state and does not expand.
Is there a way to “see” whether a process is recursive or not? The key to answering this question is the fact that recursion defers evaluation. This is what happens in the procedure body: (inc (+ (dec a) b)) defers the evaluation of inc until (+ (dec a) b) terminates. In the second example, this is not the case: (+ (dec a) (inc b)) does not defer the evaluation of +, because the arguments (dec a) and (inc b) can be immediately evaluated.
1.11 Finding an iterative solution
Another exercise about recursion versus iteration: write procedures of the following function that result in an iterative and recursive process:

The recursive solution can be translated straight from the mathematical definition:
(defn f [n]
  (if (< n 3) n
    (+ (f (- n 1)) (* 2 (f (- n 2))) (* 3 (f (- n 3))))))
This is an example that shows how recursion is often a much more straight-forward way of defining procedures. To see that this generates a recursive process, we can look at one the of the operands, e.g. (* 3 (f (- n 3))): here, the * operation is deferred until (f(- n 3)) terminates.
To come up with an iterative solution, we need to do a bit of thinking beforehand. To start, lets write down a few of the first iterations:
f(0)  = 0
f(1)  = 1
f(2)  = 2
f(3)  = f(2) + 2 * f(1) + 3 * f(0)
      =   2  + 2 *  1   + 3 *  0
      = 4
f(4)  = f(3) + 2 * f(2) + 3 * f(1)
      =  4   + 2 *   2  + 3 * 1
      = 11
For n >= 3, if we write the three summands as:
= a + b + c
we notice that in each iteration following substitions happen:
a = f(a)
b = 2 * a
c = 3 * b
so all we have to do is start the iteration with the correct values for n = 3 (a = 2, b = 1, c = 0), and iterate until n < 3 and the result is stored in a
(defn f-iter [a b c step]
  (if (< step 3) a
      (f-iter (+ a (* 2 b) (* 3 c)) a b (- step 1))))

(defn fi [n]
  (if (< n 3) n
      (f-iter 2 1 0 n)))
In this procedure, no operation gets deferred, and the combination of the procedure parameters a b c step introduce a state that stores the intermediate results of each iteration.
Exercise 1.14 Tree recursion
In this exercise, we are supposed to draw the evaluation tree of the count change procedure that was defined in the text and determine the order of growth of space and steps. It’s mostly an exercise to get a feel for how recursion expands into a tree. While doing this, the key points to remember are the termination rules:
- if
amountis0then we count this as 1 way to make a change (think as if the change matches the amount, so we have found a valid way to make a change). - if
n(available coins to make a change) is 0 or ifamountis negative we count this as 0 ways to make a change (think of negative amount that we have already “overshoot” the ways to make a change, and if no available coins are left we can’t make a change either). - all other cases need further processing.
I have made a drawing of the evaluation tree. The grey nodes are 0, and the blue notes are 1

Counting the “blue” nodes, the result is 4.
I simplified the drawing. Observing that once a node reaches the state cc amount 1, the process is going to count down until it reaches cc 0 1 which counts as 1.
This gives us the answer to what growth of space is required by the process. The space is equal to the maximum depth of the tree. As the tree always counts down once n becomes one, the required space equals O(n+5) = O(n), so space grows linear.
The steps required by the process equals the number of nodes in the tree. The solution is not as obvious as it is for the space. As a very broad approximation, lets consider a generic tree that starts with cc n 5. The left side of each node converges to cc n 1 which has O(n) complexity. The right site starts with cc n-d 5, then cc n-2*d 5 and so on. In general, cc n-k 5, each node generating another subtree. This happens also for cc n 4, cc n 3, cc n 2, cc n 1. So using a very rough simplification, each subtree grows by multiplying O(n*n), and as there are 5 denominations the complexity is approximately O(n^5)
SICP Chapter 1.1, notes and (some) solutions in Clojure
Summary: Yet another SICP blog, but in Clojure and with a little bit of a Java developers’ perspective.
The “Structure and Interpretation of Computer Programs”1 (called SICP for short) is considered by many23 as one of the most influential books in computer science.
The book uses LISP as the programming language and explores concepts from a functional programming viewpoint. In a series of blog post, I going to give a short review of what I consider the most important concepts (which is subjective of course) and will provide my solutions for a selected number of exercises in Clojure.
I also intend to write for developers with a Java background. If that’s your situation, you might find some hints here.
I also provide my solutions in Github4.
Note: do yourself (and your software engineering career) a big favour and go through the book yourself first. If you only read one (programming) book in your life, choose SICP. Once you have read the corresponding chapter of each post and tried the exercises yourself, come back here to compare your results. I’m happy to discuss in the comments below anything you found out.
Today I start with chapter 1.1.
1.1 Elements of programming
Programming is not only a means to instruct a computer to perform a task but also a way for us to organise and express our ideas. We have three mechanisms to do that:
- primitive expressions
- means of combination to form compound elements from simple ones
- means of abstraction by which compound elements can be named and manipulated as units
The fundamental activity of programming is to form complex elements from simple ones. We have data (“the “stuff” we want to manipulate”) and procedures which are the descriptions of rules about how to manipulate data. The result is a (computational) process that gets executed.
The most basic element of a programming language is an expression.
42
Together with a primitive procedure we can form a compound expression, and we get to the infamous prefix notation of LISP:
(+ 41 1)
which can lead to any complex expression we like to:
(/ (+ 5 4 (- 2 (- 3 (+ 6 (/ 4 5)))))(* 3 (- 6 2) (- 2 7)))
Java note: so yes, Clojure (Lisp) is this language with those many parentheses. As a Java developer new to Lisp, you might think (as I did in the beginning): “when in doubt, throw in some more parentheses, just to be sure”. However, this, of course, is wrong: (42) is not a correct expression (as it would be in Java), because in prefix notation the first element after the opening parentheses has to be an operator. Sounds trivial but can be confusing in the beginning.
Abstraction is accomplished by naming computational objects:
(def size 2)Applied to procedure we get to compound procedures (functions):
(defn square [x] (* x x))We can now combine any kind of complex procedures:
(defn sum-of-squares [x y]
    (+ (square x)(square y)))
To execute a procedure, the interpreter of a programming language has to reverse what we have combined from simple expressions by applying a substitution model to the procedure.
There are two ways to evaluate an expression:
- Applicative-order evaluation: evaluate an expression “from inside out”, meaning, evaluate first the arguments and then apply
- Normal-order evaluation: “from outside in” or “fully expand and then reduce”
“Procedure” versus “Function”: SICP does not use the word “function” (as it is common in functional programming) but always “procedure” to distinguish the fact that a function is declarative knowledge in contrast to imperative knowledge. Declarative descriptions are concerned with “what is” whereas the imperative way describes “how to do” things. An example is the calculation of a square root function. In mathematical terms, the square root of x is y so that with y >= 0 the square of y is x. That does not serve us if we want to compute the result. Newton’s method helps here by calculating the result in successive approximations until we have a “good enough” result.
Exercises
Partial solutions to the exercises of Chapter 1.1. For the full solutions, please see my Github repo.
1.5 Applicative-order test
Given following functions:
(defn p [] (p))

(defn test [x y]
  (if (= x 0) 0 y))
What happens if we execute:
(test 0 (p))The function p is an endless recursive function that leads to an infinite loop. If a programming language evaluates in applicative-order (from “inside out”) the expression (test 0 (p)) evaluates p first and won’t finish. Normal-order evaluation, however, would finish as evaluating from “outside in” would expand test and terminate (given that if is a special form that does not use applicative-order evaluation, see next exercise).
1.6 Why if is a special form
What if we don’t define if in a special form and use instead following:
(defn new-if [predicate then-clause else-clause]
  (cond (predicate) then-clause
        :else else-clause))
Applying this to the iterative calculation of square:
(defn good-enough? [guess x]
  (< (abs (- (square guess) x)) 0.001))

(defn sqrt-iter [guess x]
  (new-if (good-enough? guess x)
    guess
    (sqrt-iter (improve guess x) x)))
What will happen?
As in exercise 1.5 shown, Clojure (Lisp) uses applicative-order evaluation. (new-if pre then else) gets evaluated by substituting all arguments first, including the else argument. The predicate cannot prevent that. For sqrt-iter that means that the recursion is going to end up in an indefinite loop.
1.7 Improving sqrt-iter by providing a better good-enough calculation
The sqrt-iter procedure terminates when the good-enough test passes. So far the condition was to measure the average error between the squared result and x. If this error is smaller than a threshold, we terminate. That fixed threshold, however, does not work for extreme cases. A better way is to measure the relative change between each iteration. If the change becomes minimal, we can stop calculating.
The solution is quite simple: we can re-use good-enough, but instead of calculating the error of the square of the current result and x, we calculate the difference between the current guess and the previous one. We only need to add another argument that stores the previous guess (and set it to 0 in the beginning):
(defn abs [n] (max n (- n)))

(defn square [x] (* x x))

(defn average [x y]
  (/ (+ x y) 2))

(defn improve [guess x]
  (average guess (/ x guess)))

(defn good-enough? [guess previous-guess]
  (< (abs (- guess previous-guess)) 0.001))

(defn sqrt-iter [guess previous-guess x]
  (if (good-enough? guess previous-guess)
    guess
    (sqrt-iter (improve guess x) guess x)))

(defn sqrt [x]
(sqrt-iter 1.0 0 x))Rapid prototyping with Spring Data Rest and Knockout.js
Summary: Tutorial showing how to rapidly develop a REST api in Java using Spring Data Rest, with Javascript frontend using Knockout.js. Complete with sample application (CORS enabled) and code available on Github1.
- Spring notes
- Build tool: Springboot
- Setup
- How to create a REST api in Java
- The domain model
- The Frontend
- Exercise
- Thanks for reading
- Resources
Time again to get our hands dirty. In this post I demonstrate how to create a REST based web application in Java with minimal effort. I’m going to use following frameworks:
I’m going to develop a complete application, with separate backend and frontend. As an example I chose to create a simple bookmark service. As I’m using Intellij Idea and Mac, the examples are geared towards those but it shouldn’t be too difficult to adjust to any other IDE like Eclipse.
Spring notes
If you are new to Spring, the Spring website can be a bit overwhelming in the beginning as there are dozens of projects to choose from. There are basically two ways to learn about Spring: reading a project documentation (which I always recommend to do first before going anywhere else) or starting with a guide.
-
http://spring.io/docs is the starting point for getting to the in-depth documentation about a Spring project. From there you can get to the projects main site (including “quick start” installation guide) or jump directly to the reference documentation or javadocs.
-
http://spring.io/guides collects short intro guides about a wide range of subjects. Start here if you want to quickly try out a feature, I find the guide quite helpful for getting started quickly.
If you haven’t done anything yet in Spring I’d recommend to have a look at the main documentation first: http://docs.spring.io/spring/docs/current/spring-framework-reference/htmlsingle/
Build tool: Springboot
Docs: http://docs.spring.io/spring-boot/docs/current-SNAPSHOT/reference/htmlsingle/#cli-init
Nowadays, every stack worth it’s salt needs a proper build tool to get up to speed quickly. I’m using Spring boot for that.
Installation: installed on my Mac the Spring Boot CLI via brew.
With Spring Boot, we can create the project and already specify what modules we are going to use. To get an overview of what is available run spring init --list.
Setup
Execute:
$ spring init --build=gradle --java-version=1.8 --dependencies=data-rest,data-jpa spring-data-rest-knockout-bookmarks
Edit gradle.build
Change into the new directory. Let’s edit the Gradle build file:
$ edit gradle.build
Remove eclipse plugin and method.
As we use Intellij we can remove the eclipse plugin and method.
Add H2 database
We are going to need some means to persist our data. For demonstration purposes the H2 in memory database is fine.
In dependencies add compile("com.h2database:h2")
Note: if you want to persist the data, you can use H2 in file based mode. I have already prepared the Github project, just remove the comments in src/main/resources/application.properties and data gets persisted between sessions.
Optional: enable debugging in the Idea
While developing I prefer to be able to debug in Idea. Add following lines to the build file to enable:
applicationDefaultJvmArgs = [
    "-agentlib:jdwp=transport=dt_socket,server=y,suspend=n,address=5005"
]
Optional: enable hot code swapping
Docs: http://docs.spring.io/spring-boot/docs/current/reference/html/howto-hotswapping.html#howto-reload-springloaded-gradle-and-intellij
Another small tweak that can come in handy is hot code swapping. The springloaded module can do that for us.
Add dependency it in buildscript:
buildscript {
	dependencies {
		....
		classpath("org.springframework:springloaded:${springBootVersion}")
	}
}


idea {
	module {
		inheritOutputDirs = false
		outputDir = file("$buildDir/classes/main/")
	}
}
However, keep in mind that Intellij does not automatically re-compile classes on saving. In order to make hot code swapping possible, either manually compile classes (eg ctrl+shit+F9 or make project) or enable “Make project automatically” in IntelliJ settings. In the beginning of a project, I prefer the latter. It has no difference on performance (on my 2013 Mac at least).
The finished gradle.build:
buildscript {
	ext {
		springBootVersion = '1.2.1.RELEASE'
	}
	repositories {
		mavenCentral()
	}
	dependencies {
		classpath("org.springframework.boot:spring-boot-gradle-plugin:${springBootVersion}")
		classpath("org.springframework:springloaded:${springBootVersion}")
	}
}

apply plugin: 'java'
apply plugin: 'idea'
apply plugin: 'spring-boot'

jar {
	baseName = 'demo'
	version = '0.0.1-SNAPSHOT'
}
sourceCompatibility = 1.8
targetCompatibility = 1.8

repositories {
	mavenCentral()
}

applicationDefaultJvmArgs = [
	"-agentlib:jdwp=transport=dt_socket,server=y,suspend=n,address=5005"
]

idea {
	module {
		inheritOutputDirs = false
		outputDir = file("$buildDir/classes/main/")
	}
}

dependencies {
	compile("org.springframework.boot:spring-boot-starter-data-rest")
	compile("org.springframework.boot:spring-boot-starter-data-jpa")
	compile("com.h2database:h2")
	testCompile("org.springframework.boot:spring-boot-starter-test")
}

task wrapper(type: Wrapper) {
	gradleVersion = '1.12'
}
Create idea project
Finally, lets create the Idea files. Run:
$ gradle idea
Open in idea.
One last clean up step is to remove the automatically generated demo files (DemoApplication.java and DemoApplicationTest.java). Also, Idea might complain about Spring not being configured, you can add the Spring facet to the project (and later add context files, see below).
We are done with setting up the project. Let’s begin to create the backend!
How to create a REST api in Java
The Spring Data Rest module takes care of a lot of boilerplate code without becoming too heavy weight or getting in the way.
Next, I’m basically doing similar steps as in the official quick start guide: http://spring.io/guides/gs/accessing-data-rest/, have a look there as well.
Let’s start with creating first the Spring context.
Add application Spring context
The modern way of Spring configuration is Java-based via annotations (even though in some cases it makes sense to mix old-style xml configuration with annotations). Create following class:
package bookmarks;

import org.springframework.boot.SpringApplication;
import org.springframework.boot.autoconfigure.EnableAutoConfiguration;
import org.springframework.context.annotation.Configuration;
import org.springframework.context.annotation.Import;
import org.springframework.data.jpa.repository.config.EnableJpaRepositories;
import org.springframework.data.rest.webmvc.config.RepositoryRestMvcConfiguration;

@Configuration
@EnableJpaRepositories
@Import(RepositoryRestMvcConfiguration.class)
@EnableAutoConfiguration
public class Application
{
	public static void main(String[] args)
	{
		SpringApplication.run(Application.class, args);
	}
}
The important detail here are the annotations of our Application class. It tells Spring to auto-configure our project as a REST application.
The domain model
As already mentioned, Spring Data Rest spares us from developing lots of boilerplate code. All we need to do is to focus on our domain model and Spring will take care of making it available via REST, including HATEOAS compatible communication (more about that later). So next we add the domain model.
Bookmark model
For demonstration purposes I’m going to develop a simple Bookmark application that has only one model class, called (guess what) Bookmark. And gosh is it simple, it has only one field called url (well ok it has two fields, the id is a mandatory identifier):
package bookmarks.domain;

import javax.persistence.*;

@Entity
public class Bookmark
{
    @Id
    @GeneratedValue(strategy = GenerationType.AUTO)
    private long id;

    @Column(nullable=false)
    private String url;

    public String getUrl()
    {
        return url;
    }

    public void setUrl(String url)
    {
        this.url = url;
    }
}
Not too complicated, is it? Next we need to add a Repository to tell Spring that we want to expose it as a REST resource. Create following interface along the model:
package bookmarks.domain;

import org.springframework.data.repository.CrudRepository;
import org.springframework.data.rest.core.annotation.RepositoryRestResource;

@RepositoryRestResource
public interface BookmarkRepository extends CrudRepository<Bookmark, Long>
{
}
That was even simpler.
And now what? That’s it! We are done and have a fully fledged REST api at our hands. It can’t get simpler than that.
Run and test
Let’s try it out. Run:
$ gradle run
and send some requests to our backend. I’m using the HTTPie2 client to send requests instead of CURL but use whatever you like.
Send a request to the root url (often called “discovery”):
$ http :8080/
HTTP/1.1 200 OK
Content-Type: application/hal+json;charset=UTF-8
Date: Fri, 10 Oct 2014 13:29:59 GMT
Server: Apache-Coyote/1.1
Transfer-Encoding: chunked
{
	"_links": {
		"bookmarks": {
			"href": "http://localhost:8080/bookmarks"
		},
		"profile": {
			"href": "http://localhost:8080/alps"
		}
	}
}
Voilà, the answer is a complete REST response. The Content-Type tells us another interesting fact:
Content-Type: application/hal+json;charset=UTF-8
Spring Data Rest automatically exposes our resources in HATEOAS manner. Specifically, it is using the HAL3 format. (I give more background about HATEOAS here).
So let’s see the bookmarks then, lets do a GET on the bookmarks resource (I’m omitting the headers in the response for now):
$ http :8080/bookmarks
HTTP/1.1 200 OK
{}
Not much going on yet. Let’s create a bookmark:
$ http POST :8080/bookmarks url=news.ycombinator.com
HTTP/1.1 201 Created
Content-Length: 0
Date: Fri, 10 Oct 2014 13:57:20 GMT
Location: http://localhost:8080/bookmarks/1
Server: Apache-Coyote/1.1
Note the Location header:
Location: http://localhost:8080/bookmarks/1
Looks good. Let’s check:
$ http :8080/bookmarks
{
	"_embedded": {
		"bookmarks": [
			{
				"_links": {
					"self": {
						"href": "http://localhost:8080/bookmarks/1"
					}
				},
				"url": "news.ycombinator.com"
			}
		]
	}
}

$ http :8080/bookmarks/1
{
	"_links": {
		"self": {
			"href": "http://localhost:8080/bookmarks/1"
		}
	},
	"url": "news.ycombinator.com"
}
It works. If you feel like it, try PUT, PATCH, DELETE, HEAD and so on.
Let’s try this…
Ok, so now lets make the bookmarks a tiny bit more interesting. We add a Note property, which we can use to add notes to a bookmark and that we want to make searchable, and a created property that should be automatically set when we create a new bookmark.
Extend the domain model:
package bookmarks.domain;

import javax.persistence.*;
import java.util.Date;

@Entity
public class Bookmark
{
	...

    private String note;

    @Column(nullable=false)
    private Date created;

	... getter and setter omitted ...
}
Set created field before saving
To add behaviour to the default CRUD resource handling, all we have to do is to add a Handler that registers to different events. In the case of the created field we want to set it before creating a new resource (and only then). As usual in Spring, this is done via annotations (read more about events here: http://docs.spring.io/spring-data/rest/docs/2.2.1.RELEASE/reference/html/#events-chapter)
Add following file:
package bookmarks.domain;

import org.springframework.data.rest.core.annotation.HandleBeforeCreate;
import org.springframework.data.rest.core.annotation.RepositoryEventHandler;

import java.util.Date;

@RepositoryEventHandler(Bookmark.class)
public class BookmarkEventHandler
{
    @HandleBeforeCreate
    public void handleBookmarkCreate(Bookmark bookmark)
    {
        bookmark.setCreated(new Date());
    }
}
In the method with @HandleBeforeCreate annotation we set the created date of the resource before it gets saved.
All left to do is to tell our main Application configuration about this handler. Edit Application.java:
public class Application
{
... main method ...
	@Bean
	BookmarkEventHandler bookmarkEventHandler()
	{
		return new BookmarkEventHandler();
	}
}
Restart and try (adding also a note this time):
$ http POST :8080/bookmarks url=news.ycombinator.com note="this is hacker news"
HTTP/1.1 201 Created
Location: http://localhost:8080/bookmarks/1

$ http :8080/bookmarks/1
{
	"_links": {
		"self": {
			"href": "http://localhost:8080/bookmarks/1"
		}
	},
	"created": "2014-10-10T14:18:19.401+0000",
	"note": "this is hacker news",
	"url": "news.ycombinator.com"
}
Works!
Search for notes
I haven’t explained yet how the resource get exposed and why it is working out of the box. It is all happening in BookmarkRespository, by, as you probably have guessed already, extending the CrudRepository interface. If you look into that interface, you will find typical CRUD operations like save, delete, exists, findAll. Those get mapped to POST, DELETE, HEAD, GET and so on.
Knowing that, we can further extend the Repository Interface with custom queries. Spring Data Rest is a sub project of Spring Data JPA. You can find more info about how to create queries here: http://docs.spring.io/spring-data/jpa/docs/1.7.1.RELEASE/reference/html/#repositories. All queries that are added to the Repository are made available under the same name (unless otherwise configured).
Let’s extend the repository with a method that searches for the content of a note in an SQL LIKE manner:
@RepositoryRestResource
public interface BookmarkRepository extends CrudRepository<Bookmark, Long>
{
    @RestResource(path="note")
    List<Bookmark> findByNoteContaining(@Param("text")String note);
}
We want to expose it under /note endpoint with text as the search text.
Let’s have a look at the bookmarks resource:
$ http :8080/bookmarks
{
	"_links": {
		"search": {
			"href": "http://localhost:8080/bookmarks/search"
		}
	}
}
There it is, a new “search” resource for bookmarks:
$ http :8080/bookmarks/search
{
	"_links": {
		"findByNoteContaining": {
			"href": "http://localhost:8080/bookmarks/search/note{?text}",
			"templated": true
		}
	}
}
I’d say that’s all pretty easy to grasp.
Let’s try it out:
$ http POST :8080/bookmarks url=news.ycombinator.com note="this is hacker news"
HTTP/1.1 201 Created

$ http :8080/bookmarks/search/note text=="hacker"
{
	"_embedded": {
		"bookmarks": [
			{
				"_links": {
					"self": {
						"href": "http://localhost:8080/bookmarks/1"
					}
				},
				"created": "2014-10-10T14:58:13.133+0000",
				"note": "this is hacker news",
				"url": "news.ycombinator.com"
			}
		]
	}
}
(Note the double equals sign == of HTTPie request, indicating that this is a path parameter and not a field of a JSON payload). It works. We don’t need anything else for our tiny bookmark service.
The Frontend
As we went ahead so fast I thought I add a frontend as well to make this a complete web application. I’m using Knockout.js (which fullfils my requirement to be light-weight and unobtrusive), jQuery and a bit of Bootstrap.
If you checkout the Github repo, you’ll see that the whole frontend is made out of two files: index.html and bookmark.js.
The Knockout Model and ViewModel defined in bookmark.js:
// The bookmark model
function Bookmark(selfHref, url, created, note) {
    var self = this;
    self.selfHref = selfHref;
    self.url = ko.observable(url);
    self.created = created;
    self.note = ko.observable(note);
}

// The bookmark view model
function BookmarkViewModel() {
    var self = this;

    self.newUrl = ko.observable();
    self.newNote = ko.observable();
    self.bookmarks = ko.observableArray([]);

    // add bookmark: send POST to bookmarks resource
    self.addBookmark = function () {
        // a little bit of pre-processing of user entered url and note
        var newUrl = self.newUrl();
		var newNote = self.newNote();
		...
        // make POST request
        $.ajax("http://localhost:8080/bookmarks", {
            data: '{"url": "' + newUrl + ' ", "note": "' + newNote + '"}',
            type: "post",
            contentType: "application/json",
            success: function (allData) {
                self.loadBookmarks();
                self.newUrl("");
                self.newNote("");
            }
        });
    };

    // update bookmark: send PUT to existing bookmarks resource
    self.updateBookmark = function (bookmark) {

        // same as in "addBookmark" a little bit of parameter checking. Some code duplication here
        // but we leave it for demonstration purposes
        var newUrl = bookmark.url();
        var newNote = bookmark.note();
		...
        // make PUT request (or send PATCH then we don't need to include the created date)
        $.ajax(bookmark.selfHref, {
            data: '{"url": "' + newUrl + ' ", "note": "' + newNote + '", "created": "' + bookmark.created +'"}',
            type: "put",
            contentType: "application/json",
            success: function (allData) {
                self.loadBookmarks();
            }
        });
    };

    // delete bookmark: send DELETE to bookmarks resource
    self.deleteBookmark = function (bookmark) {
        $.ajax(bookmark.selfHref, {
            type: "delete",
            success: function (allData) {
                self.loadBookmarks();
            }
        });
    };

    // load bookmarks from server: GET on bookmarks resource
    self.loadBookmarks = function () {
        $.ajax("http://localhost:8080/bookmarks", {
            type: "get",
            success: function (allData) {
                var json = ko.toJSON(allData);
                var parsed = JSON.parse(json);
                if (parsed._embedded) {
                    var parsedBookmarks = parsed._embedded.bookmarks;
                    var mappedBookmarks = $.map(parsedBookmarks, function (bookmark) {
                        return new Bookmark(bookmark._links.self.href, bookmark.url, bookmark.created, bookmark.note)
                    });
                    self.bookmarks(mappedBookmarks);
                } else {
                    self.bookmarks([]);
                }
            }
        });
    };
    // Load initial data
    self.loadBookmarks();
}
// Activates knockout.js
ko.applyBindings(new BookmarkViewModel());
It’s out of scope to explain Knockout here (have a look at their interactive tutorial, it’s quite good). The things to note besides the standard Knockout data-bindings (which are used in index.html, see next) are the jQuery calls to our backend. We are using the bookmarks resource and if you look at the Javascript Bookmark model you notice that we store the self ref of a resource:
function Bookmark(selfHref, url, created, note) {
	...
    self.selfHref = selfHref;
	...
}
With that we can comfortably access the ressource (bookmark.selfHref), e.g. in delete:
// delete bookmark: send DELETE to bookmarks resource
self.deleteBookmark = function (bookmark) {
	$.ajax(bookmark.selfHref, {
		type: "delete",
		success: function (allData) {
			self.loadBookmarks();
		}
	});
};
In index.html we add a form and table and include the Knockout bindings:
<form data-bind="submit: addBookmark" class="form-horizontal">
	<div class="form-group">
		<label for="inputUrl" class="col-sm-2 control-label">Url</label>

		<div class="col-sm-10">
			<input data-bind="value: newUrl" type="text" class="form-control" id="inputUrl" placeholder="Url">
		</div>
	</div>
	<div class="form-group">
		<label for="inputNote" class="col-sm-2 control-label">Note</label>

		<div class="col-sm-10">
			<input data-bind="value: newNote" type="text" class="form-control" id="inputNote"
				   placeholder="Note (optional)">
		</div>
	</div>
	<div class="form-group">
		<div class="col-sm-offset-2 col-sm-10">
			<button type="submit" class="btn btn-default">Add</button>
		</div>
	</div>
</form>

...

<tbody data-bind="foreach: bookmarks">
<tr>
	<td><a data-bind="attr: {href: url}">open</a></td>
	<td><input style="width: 100%" data-bind="value: url"/></td>
	<td><span data-bind="text: created"></span></td>
	<td><input style="width: 100%" data-bind="value: note"/></td>
	<td>
		<button type="button" class="btn btn-default btn-sm" data-bind="click: $root.updateBookmark">Update
		</button>
	</td>
	<td>
		<button type="button" class="btn btn-default btn-sm" data-bind="click: $root.deleteBookmark">Delete
		</button>
	</td>
</tr>
</tbody>
The resulting UI looks like this:

The app lets you do all that is necessary: create, edit, delete and open bookmarks.
Now, serve up the file from IntelliJ Idea (open index.html and select chrome for example). Fill in an url and a note and hit “Add” …
Nothing happens? Doesn’t work?
A look into the Javascript console of Chrome gives us a hint:

Yes indeed, we are building an actually separated client-server web application and have forgotten about this thing called CORS4. It is also out of scope to say more about it (sorry, but maybe in another post), but you can read up on it here: http://en.wikipedia.org/wiki/Cross-origin_resource_sharing. In short, our server needs to allow cross-domain requests and I wanted to show how we can do that.
The last piece: enable CORS on the backend
CORS requires us to respond with certain headers. During our prototyping phase we are going to allow all. This can be done easily with adding a servlet Filter to our backend.
Add following file:
package bookmarks.filter;

import org.springframework.stereotype.Component;

import javax.servlet.*;
import javax.servlet.http.HttpServletResponse;
import java.io.IOException;

@Component
public class CORSFilter implements Filter
{
    public void doFilter(ServletRequest req, ServletResponse res, FilterChain chain) throws IOException, ServletException
    {
        HttpServletResponse response = (HttpServletResponse) res;
        response.setHeader("Access-Control-Allow-Origin", "*");
        response.setHeader("Access-Control-Allow-Methods", "POST, PUT, PATCH, GET, OPTIONS, DELETE");
        response.setHeader("Access-Control-Max-Age", "3600");
        response.setHeader("Access-Control-Allow-Headers", "x-requested-with");
        response.setHeader("Access-Control-Allow-Headers", "Content-Type");
        chain.doFilter(req, res);
    }
    public void init(FilterConfig filterConfig){}
    public void destroy(){}
}
And similar to the event handler, we modify Application.java to configure Spring to use the filter. Add following method:
@Bean
public FilterRegistrationBean commonsRequestLoggingFilter()
{
	final FilterRegistrationBean registrationBean = new FilterRegistrationBean();
	registrationBean.setFilter(new CORSFilter());
	return registrationBean;
}
Restart and the app will work. Happy bookmarking :-)
Checkout the source code on Github.
Exercise
If you feel like playing with the tutorial app: can you extend it and add a search field for notes to the UI? And then make url searchable, and after that you could add pagination and ordering (hint: you use a different repository to inherit from)…
In a follow-up post, I have extended the bookmark application with a scraping and source code extraction feature (implemented as a microservice).
Thanks for reading
I hope this post was helpful for you. If you have comments, questions or found a bug please let me know, either in the comments below or contact me directly.
Resources
Dealing with complexity - Out of the Tar Pit
Summary: In this post I recap the paper “Out of the Tar Pit” that gives answers to a fundamental question in software development: is complexity inevitable or can it be avoided? What is complexity in the first place and what are possible remedies?
Does software have to be complex? Is it unavoidable that any growing software system gives rise to more complexity and every new feature or change makes it more error prone? Or is there hope (on the far horizon) that complexity can be avoided and we just haven’t figured out yet how?
It’s a fundamental question. In our daily lives as software developers we try to produce “quality” code that is clean, robust and reliable. This is often more art than science (or engineering) and depends on how well the problem we try to solve is understood and how thorough we test and refactor. But if complexity is inherent in software development all we can hope to do is to minimize the damage. That is not very satisfying and I’m wondering if we can’t do better than that.
In a series of blog posts I’d like to find some answers. Today I start with a paper that is considered 1 to be a classic: “Out of the Tar Pit” by Ben Moseley & Peter Marks 2
What is complexity and why is it a problem?
Complexity is the root cause of the vast majority of problems with software today.
If we we agree that complexity is the main culprit for our problems with current software the first question to answer is: what is complexity?
The authors define complexity indirectly as something that makes a system hard to understand. From this follows the opposite: simplicity makes a system easy to understand. However, “simplicity is hard” and as Rich Hickey would say that “simple is not easy” 3 that “easiness” of understanding may still require effort and experience.
How can we “understand” a system then? There are two ways:
- from the outside: testing
- from the inside: informal reasoning
With Testing we are treating a system as a black-box and observe its behaviour from the outside. Informal reasoning attempts to understand a system from the inside by examining its parts and inner workings.
Testing leads to the detection of more bugs, whereas informal reasoning leads to less errors being created. From that standpoint informal reasoning is more important of course. As a developer that is what I mean by “understanding” a system, that I can reason about its inner workings. Testing is limited and almost impossible to do without any reasoning about the system.
What causes complexity?
Now we come to the interesting part: where does complexity come from? What are the causes?
The number one enemy is this ugly little guy called state. The recent popularity of functional programming languages shows the desire to tame this beast. What is the problem with state regarding to understanding?
- The behaviour of a system in one state tells you nothing about the behaviour in another state. Testing tries to get away with this by always starting in a “clean state”. But that is not always possible and a system can get too easily into a “bad state”.
- Informal reasoning often resolves around a case-by-case simulation of the behaviour of a system. Each new state doubles (at least) the possible states to consider and with this exponential growth the mental approach reaches very soon its limits.
- State can contaminate and spread through a system. A part that has no state but a dependency to another stateful part becomes automatically affected by that state.
The second cause of complexity is control. Which is basically the order in which things happen. The problem with control is that in most cases we don’t want to be concerned with it but are enforced to do so due to the limits of the programming language. We have to over-specify a problem.
Other causes:
- Sheer code volume. The authors disagree that complexity has to rise in a non-linear way with the amount of code lines of a system. In other words: complexity is not necessarily inherent in software.
- Complexity breads complexity: see above regarding state, complex parts can contamine other parts. It is therefore important to contain complexity.
- Simplicity is hard. It requires effort to keep a system simple.
- The power of a programming language creates complexity. The more I can do with it, the more ways I have at my hands to create complexity.
Two types of complexity
We know the causes of complexity and what it does to our understanding of a system. So what can we do about it? The authors define two types of complexity:
- Essential complexity, which is inherent in the problem itself (as seen by the user).
- Accidental complexity is all the rest and which would not appear in an ideal world.
The word “essential” is meant in the way of strictly essential to the users’ problem. If there is a possible way a development team can produce a correct system (in the eyes of the user) without the need of that type of complexity it is not essential.
How can we avoid complexity in the ideal world?
To determine what type of complexity can be avoided the authors first look at the best possible solution that could exist if we lived in an ideal world.
In this world, following things are true:
- We are not concerned with performance.
- When we translate the users’ informal requirements into formal requirements, the formalisation is done without adding any accidental aspects at all.
- After formalisation the only step left to do is to simply execute the formal requirements on our underlying infrastructure.
The last step is the very essence of declarative programming: we only specify what we require but not how it must be achieved. There is therefore no need for control in the ideal world.
State & data in the ideal world
State in the ideal world only depends on data that the user specifies in the informal requirements. The authors distinguish between following types:
- Data is either provided directly to the system (as input) or derived.
- Derived data is either immutable or mutable.
With this we get four types of data:
- Input data: data that is specified in the requirements is deemded essential. However, only if there is a requirement that it might be referred to in the future. If that is not the case, there is not need to store the data and the resulting state is accidental.
- Essential derived data that is immutable: that data can always be re-derived and is not essential.
- Essential derived data that is mutable: modifications to the data can be treated as applying a series of function calls on the existing essential state and is therefore also accidental.
- Accidental derived data: this state is derived but not in the requirements of the user and therefore not essential.
Summarized in following table:
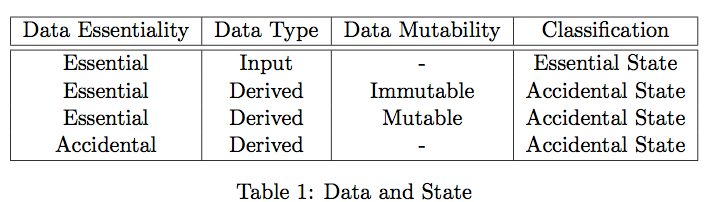
Only input data that has to be stored is therefore essential. Control is considered entirely accidental as it can be completely omitted in the ideal world.
The real world
In the real world things are of course not as easy and some accidental state might be required:
- Performance: in some cases performance is an issue and requires accidental state (eg. cache). The recommendation to deal with it is to restrict ourselves to simply declare it and leave it to a completely separate infrastructure to deal with it
- Ease of expression: in some cases accidental state might the most natural way to express logic in a system.
The authors give us two recommendations to deal with complexity in the real world:
- Avoid accidental complexity where possible
- Separate out all complexity from the pure logic of the system
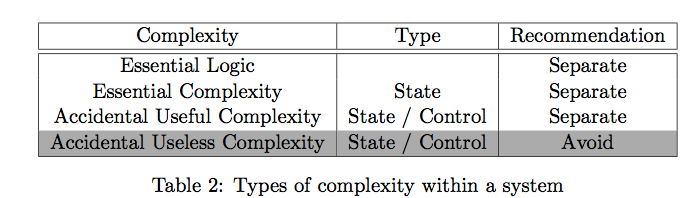
The main implication to keep in mind is that the system should still function correctly even if the “accidental but useful parts” are removed.
Designing a system
The authors finally recommend an architecture of a system that follows the guidelines:

The arrows show the dependencies of such a system:
- Essential state: is the foundation of the system and completely self-contained such that it makes no reference to any other part. Changes here may require changes in the rest but never the other way around.
- Essential logic: the “heart” of the system which is often called “business logic”. This part does depend on the the essential state but nothing else.
- Accidental state and control: the least important part of the system, changes here can never affect essential logic or state.
Key takeaways
Start with the ideal world and ask: what type of complexity is unavoidable? The answer is only the one that is required by the users’ requirements. Everything else should be considered accidental. That gives us an important distinction: complexity is either essential or accidental.
The main causes of complexity are state and control. State makes reasoning and testing exponentially more difficult. Control is completely accidental. Also, complexity spreads and contaminates so it is important to contain it.
In order to design a simple system we need first to avoid complexity and if that’s not possible separate complexity from the logic of the system.
So what is the final answer to the ultimate question: is complexity inevitable and inherent in software? The authors give hope that most complexity could be indeed avoided and systems could be much simpler and easier to understand and therefore more reliable and bug-free.
Note: if you want to see a real system that follows the recommendations have a look at the second part of the paper (which I haven’t included in my review) where the authors propose a solution called Functional Relational Programming.
Thanks for reading
I hope you enjoyed reading this post. If you have comments, questions or found a bug please let me know, either in the comments below or contact me directly.
Resources
Testing a HATEOAS api with RestAssured
In this post I describe how a REST API that follows HATEOAS can be easily tested in Java using RestAssured framework.
Before I come to that, first a short explanation what that strange acronym means.
A RESTful api is not complete without HATEOAS. As Joe Fielding tells in his blog1 “What needs to be done to make the REST architectural style clear on the notion that hypertext is a constraint?”
HATEOAS
What sounds like an organisation of angry citizens is the acronym of that constraint: HATEOAS. It stands for: Hypermedia As The Engine Of Application State.
Two words are significant: Hypermedia and Application State.
Hypermedia is a combination of hypertext and media, that is, non-sequential text and media (audio, video) that connects its parts via links.
Application state is the state that the resource is in at any given moment. The state of a RESTful application is fully defined by it’s representation - the representation is the state of the resource. Because of that, a state diagram reflects the application by specifying all possible states and its edges2.
No prior knowledge.
A state diagram always has exactly one entry point. And this is what it makes so powerful: apart from the entrance URL, a client of an API does not need to have any other knowledge.
A RESTful API can be compared to a website. As a user, I only know the root URL of a website. Once I type in the URL (or click on the link) all further paths and actions are defined by other links. Those links may change at any moment, but as a user, all I need to know is the root URL and I’m still able to use the website.
Many REST APIs ignore HATEOAS. And this comes with a substantial cost of tight coupling.
Links
The question is: how do we describe the links that lead from one state to another? And where do we put that information?
To answer the latter question, usually, two places are used: in the HTTP header or in the JSON payload.
Links in the HTTP header
HTTP defines a links section in its header: “The Link: header in HTTP allows the server to point an interested client to another resource containing metadata about the requested resource.”3. Putting links in the header has the advantage that they can be retrieved without accessing the actual resource (by calling HEAD on that resource). However, I prefer to put links in the JSON payload, because header information is metadata and links are an essential part of the REST API.
Links in the JSON payload
To further differentiate links from “normal” response fields, they often are prefixed by an underscore. So every JSON response of a resource has to contain a _links field describing the available paths from the current representation of the resource.
That leaves us with the last open question to answer: how do we actually describe a link? There are several ways conceivable, but in my opinion the most obvious way is to follow the HTTP header structure with a rel attribute that describes the relationship of the link and href.
For example, let’s assume I have developed a blogging API. All I know is the root URL and doing a GET on that URL returns following response:
GET /

HTTP/1.1 200 OK
{
    "_links" : [
        {
            "rel": "users",
            "href": "/users"
        },
        {
            "rel": "posts",
            "href": "/posts"
        }]
}
To retrieve a list of post, the client does not have to know anything about how the URLs are constructed. Instead, he follows the “posts” relation and retrieves the links from there.
GET /posts

HTTP/1.1 200 OK
{
    "posts": [
        {
            "message": "my first new post",
            "_links": {
                "rel": "self",
                "href": "/posts/1",
            }
        },
        {
            "message": "my second new post",
            "_links": {
                "rel": "self",
                "href": "/posts/2",
            }
        }
    ]
    "_links" : [
        {
            "rel": "new",
            "href": "/posts",
        },
        {
            "rel": "self",
            "href": "/posts",
        }]
}
Only one relation is mandatory: self, which is a link to the resource itself. Following the self relation, the client can retrieve further operations on that resource.
Depending on the actual API, more attributes can be included, for example “method” and “content-type”. This depends on how “self-explanatory” the API and resources are.
In another post, I’m going to explain in more details how to design an HATEOAS constrained REST API, for now, I’d like to show how easy it is to test an API like that.
Testing an HATEOAS REST API
(Unit-)testing an API becomes much straight-forward if no prior knowledge about the URLs is required. The same advantage that goes for clients applies to tests.
Let’s write a test case for the blogging API. We create a new post and test whether it appears in the list of posts.
public class BlogApiTestCase
{
    @Test
    public void testPosting()
    {
        final ApiClient api = new ApiClient();

        // Assert that there are no posts in the system: get posts resource
        api.discovery().rel("posts").get();

        List<Map> posts = api.getJsonPath().getList("posts");
        assertThat(posts.size()).isEqualTo(0);

        // Create a new post: use "new" relation. Continue where we left off
        api.rel("new").post("{\"post\":{\"message\": \"A new blog post\"}}");

        // As above: now there should be one new post. Go back to entrance point ("discovery") => "posts"
        List<Map> newPosts = api.discovery().rel("posts").get().getJsonPath().getList("posts");
        assertThat(newPosts.size()).isEqualTo(1);
    }

}
The key advantage is that we can test the API the same way a real front-end client would use it, by navigating the links.
Another advantage of testing like that is that it automatically ensures your API is HATEOAS compatible - if you can’t test it by following links the API is not RESTful.
Extending RestAssured
I have created a tiny GitHub project4 that builds on top of RestAssured5. It consists of just one file, the test client class, and allows testing by navigating links.
An excerpt of that class (ApiClient):
import static com.jayway.restassured.*;
import static org.fest.assertions.Assertions.assertThat;

public class ApiClient
{
    private Response currentResponse;
    private String currentUrl;

    // ---------------------------------
    // Links relation
    // ---------------------------------

    public ApiClient rel(String rel)
    {
        this.currentUrl = getRelHref("", rel);
        return this;
    }

    public String getRelHref(String field, String rel)
    {
        if (!StringUtils.isEmpty(field))
        {
            field = field + ".";
        }

        final String path = field + "_links.find{_links -> _links.rel == '" + rel + "'}.href";
        logPath(path);
        String url = currentResponse.then().extract().path(path);
        logUrl(url);

        return url;
    }

    // ---------------------------------
    // Http requests
    // ---------------------------------

    public ApiClient URL(String url)
    {
        this.currentUrl = url;
        return this;
    }

    public ApiClient discovery()
    {
        currentResponse = url("/").get();
        return this;
    }

    public ApiClient post(String json)
    {
        currentResponse = given().contentType(ContentType.JSON).body(json).post(currentUrl);
        logResponse();
        assertOkResponse();
        return this;
    }

    public ApiClient get()
    {
        currentResponse = get(currentUrl);
        logResponse();
        assertOkResponse();
        return this;
    }
}
One of the key features we are taking advantage of is the usage of GPath6, which allows finding elements using expressions.
When we navigate through the links, most of the time we just want to follow the href value of a specific rel attribute (for example “posts”). In RestAssured, this can be done as follows:
_links.find{_links -> _links.rel == "posts"}.href
That returns href values of all links that have the relation rel=="posts".
Storing that url as currentUrl and also keeping track of the latest response of each call, it becomes straightforward to navigate along the links and testing the api on the way.
Have a look at the GitHub file (https://github.com/BernhardWenzel/hateoas-api-test-client) if interested. The client offers more methods for testing an API on the go (for example, if a response is an array of elements, pick one element based on a condition and continue navigating).
In a future post I’ll demonstrate how to use the test class to create more complex test cases, like that one:
api
 .discovery().rel("users").get()
 .filterRel("users", "name=='Tom.Hanks'", "self").get()
 .rel("user", "profilePictures").get()
 .rel("pictures", "pictures[0]").get()
 .rel("picture", "new").post("{'path': 'files/pic2.jpg'}")
Thanks for reading
I hope you enjoyed reading this post. If you have comments, questions or found a bug please let me know, either in the comments below or contact me directly.