Nobody knows but at least someone owns it
Nobody knows what to do.
Admitted, that sounds rather clickbaity, but sometimes being a bit extreme can help make a point.
Technology has become way too complex for one individual to fully comprehend. Any fundamental change will lead to uncertaintenties that make it impossible to forsee every possible outcome.
And we can’t research everything before starting to implement the change we want to have. The time we can invest into reading documentation, interviewing experts and building proof of concepts is limited (mostly but not only because of economical reasons).
We are all guessing, more or less. Some may have a lot of experience in one area, and that certainly helps, but requirements are ever changing as is the environment.
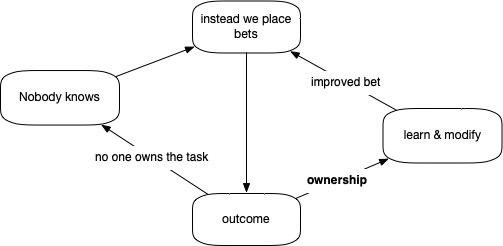
So instead of exactly knowing what to do, we are placing bets. We make (hopefully) good informed decisions and see how they work out.
But what if our bets don’t work out?
Then we correct our assumptions and place another, hopefully improved bet.
To greatly increase the chances that this iterative process leads to a good solution, one concept is essential: it’s called ownership.
Only if someone owns the process of placing bets we can make sure every bet brings us closer to our goal.
If nobody owns the consequence of a decision, we leave it up to chance that someone will take charge to create the improved, modified new bet. However, this new person still doesn’t know.
The following diagram summarizes my point:
What is (software) strategy, anyway?
I kick this newsletter off with a little exploration of the word “strategy”, in particular in the context of software development. It is such a generic word that I think it would be useful to specify what I mean by it. An understanding of something broad and generic is likely to change over time so this is my first attempt but I may come back and refine what I said.
Let me start with what is NOT a strategy:
- Random actions are not a strategy
- A plan that is not expressed or formulated in any way is not a strategy.
- A strategy where it’s key components are not somehow measurable or teachable to others is not a strategy
- A strategy that can not explain why it leads to certain actions (and not others) is not a strategy
- A strategy that changes and can’t explain why it does is not a strategy
- A strategy that allows actions that go against it is not a strategy
So then what is it?
Wikipedia:
Strategy is a high level plan to achieve one or more goals under conditions of uncertainty. 1
Let’s analyze this definition in the context of software architecture by starting at the end and going backwards.
What are the uncertainties of software?
The most common source of uncertainty stems from entropy. It still amazes me every day how quickly something simingly simple becomes all of a sudden complex and difficult to understand.
Computer professionals answer the challenge of entropy with creating a lot of frameworks, programming languages, design patterns etc. Going one step further, the uncertrainty of software development comes from making the right (technological, design) choice (if there was, for example, only one programming language available (“FORTRAN”), then there would be no uncertrainty in choosing it).
What are goals?
The goal of software can vary a lot depending on the context where it is used (e.g. open-source versus comercial software). In this newsletter, I solely focus on developing comercial software. That means, the primary goal is to meet business goals. Without a functioning business, there is no software. Does the design and architecture of our software ensure that it delivers everything necessary to succeed as a business?
Out of the business goals we can derive functional and non-functional requirements. Being an architect, I write mostly about non-functional requirements or goals
What is a high-level plan?
Now the final missing piece of the definition: what do we mean with a “high-level plan” in terms of software architecture?
“Having a plan” is what most people would think of what makes a strategy.
In software development, a plan consists of three ingredients:
- Specification of requirements
- Research of options and choosing among the options
- Proposing actions that meet requirements and are based on the choices made in step 2)
Requirements can be functional and non-functional, options are technological and architectural design choices and actions are concrete steps to implement software the meets the requirements.
Software Strategy
Depicted what was said we get following diagram:
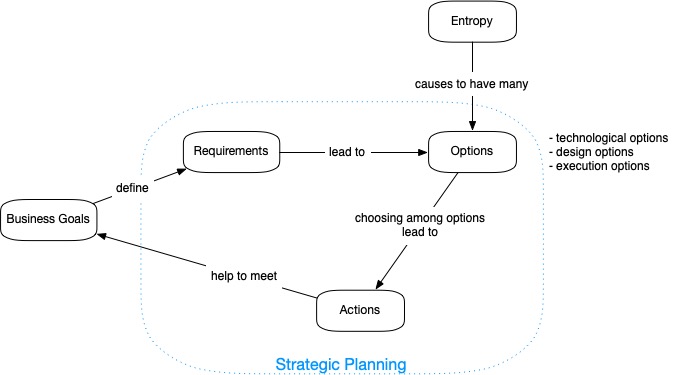
Business goals define requirements. Entropy and uncertainties motivate creation of options (technological, design, execution) and choosing from those options lead to actions. Strategic planning (requirements + options + actions) helps to meet business goals.
Summary
Taking everything together, I use the word strategy in the context of software development as follows: a strategy consist of strategic planning which is a three step process of requirements gathering, evaluation of options and specification of actions in order to meet business goals in an environment of increasing entropy.
Using Clojure on AWS Lambda
Summary: Dive into serverless with Clojure. We explore ways to use Clojure instead of Java to implement AWS Lambda functions. Following the official AWS documentation, we first implement “Hello Worlds” using Java which we then emulate in Clojure. Pure Java-only developers can skip the Clojure part, and Clojure developers may learn more about Java interop.
- What is AWS Lambda?
- Requirements
- Configure permissions
- Implement Lambda function handler
- Summary
- References
What is AWS Lambda?
AWS is a serverless computing platform that runs code in response to events and automatically manages the computing resources that the execution of the code requires 1. In other words, with AWS Lambda you can execute Clojure (or other languages) code without the hassle of setting up a server environment. Just assemble and upload a JAR file of your code, and you are ready to go.
The word “serverless” is a bit of a misnomer. There are still servers running in the background, but they are entirely hidden.
Requirements
You are going to need an account at AWS and have the AWS CLI tool installed. Please refer to the official documentation on how to do that.
Source code
Available as usual on Github2. Clone that or follow along coding everything yourself. The easiest way is to use leiningen new clojure-aws-lambda with two source folders: src/clojure and src/java.
Configure permissions
Before we can execute Lambda functions, we need to set up the permissions and create a role using IAM. Following JSON grants a basic trust relationship with our lambda functions.
{
  "Version": "2012-10-17",
  "Statement": [
    {
      "Sid": "",
      "Effect": "Allow",
      "Principal": {
        "Service": "lambda.amazonaws.com"
      },
      "Action": "sts:AssumeRole"
    }
  ]
}
Using the AWS CLI we can create a new role:
aws iam create-role \
--role-name basic_lambda_role \
--assume-role-policy-document fileb://resources/trust_relationship.json
Observe the response:
ROLE    arn:aws:iam::248689245702:role/basic_lambda_role    2018-10-01T14:39:50Z    /    AROAISQSNKXPE4G4F4GFE    basic_lambda_role
ASSUMEROLEPOLICYDOCUMENT    2012-10-17
STATEMENT    sts:AssumeRole    Allow
PRINCIPAL    lambda.amazonaws.com
AWS returns the ID of the role arn:aws:iam::248689245702:role/basic_lambda_role. Keep note or use aws iam list-roles to retrieve it later.
Next, we need to attach a policy (we use default policy provided by AWS, the ID is arn:aws:iam::aws:policy/service-role/AWSLambdaBasicExecutionRole)
aws iam attach-role-policy \
--policy-arn arn:aws:iam::aws:policy/service-role/AWSLambdaBasicExecutionRole \
--role-name basic_lambda_role
Implement Lambda function handler
The way to run Clojure on Lambda is to emulate the Java approach.
AWS supports two ways for creating a handler on the Java platform3:
- Implement the function method directly using plain Java 4 without using an interface.
- Implement the function by leveraging a predefined interface (
RequestHandlerorRequestStreamHandler)5.
1. Implement directly without using an interface
1.1 Using plain Java
public class PlainJavaHandler {
    public String myHandler(String input, Context context) {
        return String.valueOf("Hello " + input.get("firstName") + " " + input.get("lastName"));
    }
}
To create a new Lambda function, we need to build our project and upload a jar file containing all the dependencies. We are using Leiningen, the Clojure build tool, to compile all the Java and Clojure code.
To create the jar file, run lein uberjar now.
This creates a new jar file target/clojure-aws-lambda-0.1.0-SNAPSHOT-standalone.jar which we can upload to AWS. (Note: this jar contains the code for the handler for all of the Java and Clojure cases. In a real project, we would not pack everything into one jar file; we do it here for the sake of simplicity).
Create function using the AWS CLI (for a list of commands see 6)
aws lambda create-function \
--function-name PlainJavaHandler \
--runtime java8 \
--role arn:aws:iam::248689245702:role/basic_lambda_role \
--handler javahandler.PlainJavaHandler::myHandler \
--zip-file fileb://target/clojure-aws-lambda-0.1.0-SNAPSHOT-standalone.jar \
--region us-east-1
The name of the handler follows this schema: <package>::<method>
Note: use the proper values for region and add --profile <NAME> in case you have created a dedicated user for lambda.
We are going to test this function using the following input:
"World"We can use the invoke command of the CLI to send the content of this file to the lambda function.
aws lambda invoke \
--function-name PlainJavaHandler \
--payload fileb://resources/string-input.txt \
out.txt
The response is captured in out.txt.
$ cat out.txt
"Hello World!"
It works.
Direct approach Clojure version
Now let’s implement the same handler in Clojure. The Clojure code has to generate a class file with similar properties.
Ahead of time compiling
Clojure compiles all code on the fly into JVM bytecode which will be loaded dynamically. However, to execute the code on Lambda platform, we need to enable ahead-of-time compiling 7, so we can use the gen-class macro 8 to create the Java classes from our Clojure code.
We enable AOT in our project definition using the :aot :all keywords:
(defproject clojure-aws-lambda "0.1.0-SNAPSHOT"
  :source-paths ["src/clojure"]
  :java-source-paths ["src/java"]
  :dependencies [[org.clojure/clojure "1.8.0"]
                 [com.amazonaws/aws-lambda-java-core "1.1.0"]]
  :aot :all)
Now we can implement the Clojure code:
(ns clojurehandler.plain_clojure_handler
  (:gen-class
    :name "clojurehandler.PlainClojureHandler"
    :methods [[myhandler [String com.amazonaws.services.lambda.runtime.Context] String]]))

(defn -myhandler [this s ctx]
  (str "Hello" s "!"))
Notice the function signature. We need to pass in a self-reference this due to how the Clojure compiler generates the Java classes.
We can now build and deploy the jar and create a new lambda function which we name PlainClojureHandler:
aws lambda create-function \
--function-name PlainClojureHandler \
--runtime java8 \
--memory-size 256 \
--role arn:aws:iam::248689245702:role/basic_lambda_role \
--handler clojurehandler.PlainClojureHandler::myhandler \
--zip-file fileb://target/clojure-aws-lambda-0.1.0-SNAPSHOT-standalone.jar \
--region us-east-1
Note: To make this work, I needed to increase the memory-size of the lambda function to 256 MB (the default memory size is 128mb, which leads to a java.lang.OutOfMemoryError: Metaspace error).
Now we can invoke the function using our test file that contains the simple string:
aws lambda invoke \
--function-name PlainClojureHandler \
--payload fileb://resources/string-input.txt \
out.txt
The response is again captured in out.txt
$ cat out.txt
"Hello World!"
1.2 Implement using POJOs
Instead of using primitive input, we can use a POJO as request and response parameter.
package javahandler;
public class Request {
    private String firstName;
    private String lastName;
    public Request(){}
    public Request(String firstName, String lastName) {
        this.firstName = firstName;
        this.lastName = lastName;
    }
    /** ... getter and setter omitted ... **/
    }
}package javahandler;
public class Response {
private String hello;
public Response(){}
public Response(String hello) {
this.hello = hello;
}
/** getter and setter omitted.... **/
}Now our handler function uses POJO classes in the method signature: Response myHandler(Request input, Context context):
package javahandler;

import com.amazonaws.services.lambda.runtime.Context;

public class POJOJavaHandler {
    public Response myHandler(Request input, Context context) {
        final Response response = new Response();
        response.setHello("Hello " + input.getFirstName() + " " + input.getLastName() +"!");
        return response;
    }
}
With this in place, we can send JSON input to our lambda function that AWS will automatically (de-)serialise:
{
  "firstName": "John",
  "lastName": "Smith"
}
Creating a new function that we call POJOHJavaHandler (just replace --function-name and --handler:
aws lambda create-function \
--function-name POJOJavaHandler \
--runtime java8 \
--role arn:aws:iam::248689245702:role/basic_lambda_role \
--handler javahandler.POJOJavaHandler::myHandler \
--zip-file fileb://target/clojure-aws-lambda-0.1.0-SNAPSHOT-standalone.jar \
--region us-east-1
Let’s test this function, sending the JSON to the function:
aws lambda invoke \
--function-name POJOJavaHandler \
--payload fileb://resources/test-input.json \
out.txt
Have a look at the response:
$ cat out.txt
{"hello":"Hello John Smith!"}
Note: we could have used JSON in the plain Java approach as well. However, AWS does not serialise JSON into a String. Instead, the input will be a Map<String, Object>. As an exercise, you might want to try to modify the plain Java version and send the JSON file as input.
POJO Clojure version
The natural choice in Clojure to implement a POJO class should be using a defrecord9.
(ns clojurehandler.pojo_clojure_handler)

(defrecord Request [firstname lastname])
(defrecord Response [hello])

(gen-class
  :name "clojurehandler.POJOClojureHandler"
  :methods [[myhandler [clojurehandler.pojo_clojure_handler.Request com.amazonaws.services.lambda.runtime.Context] clojurehandler.pojo_clojure_handler.Response]])

(defn -myhandler [this request ctx]
  (Response. (str "Hello " (:firstname request) " " (:lastname request) "!")))
Unfortunately, though this compiles it won’t work. AWS uses Jackson to serialise JSON requests which requires the empty default constructor of our Request and Response classes. In the immutable world of Clojure, a defrecord won’t generate such constructor for us. We can’t use them.
We could use gen-class to generate the POJOs. However, that would feel awkward. We’d have to create getters and setters and so on. Instead, we can “cheat” here and use the Java POJOs that we have already defined. This does make sense as POJOs don’t belong to Clojure’s world.
(ns clojurehandler.pojo_clojure_handler
  (:import (javahandler Request Response)))

(gen-class
  :name "clojurehandler.POJOClojureHandler"
  :methods [[myhandler [javahandler.Request com.amazonaws.services.lambda.runtime.Context] javahandler.Response]])

(defn -myhandler [this request ctx]
  (Response. (str "Hello " (.getFirstName request) " " (.getLastName request) "!")))
(Note: I still had to fully qualify the Request and Response classes in gen-class, thus actually not using the import of Request.)
Let’s create the function (remember to provide extra memory):
aws lambda create-function \
--function-name POJOClojureHandler \
--runtime java8 \
--memory 256 \
--role arn:aws:iam::248689245702:role/basic_lambda_role \
--handler clojurehandler.POJOClojureHandler::myhandler \
--zip-file fileb://target/clojure-aws-lambda-0.1.0-SNAPSHOT-standalone.jar \
--region us-east-1
aws lambda invoke \
--function-name POJOClojureHandler \
--payload fileb://resources/test-input.json \
out.txt
Have a look at the output to confirm it worked:
$ cat out.txt
{"hello":"Hello John Smith!"}
2. Implement a predefined interface
2.1 RequestHandler interface
Instead of relying on the input and output parameter of our handler method, we can leverage the RequestHandler interface of the AWS sdk:
package javahandler;
import com.amazonaws.services.lambda.runtime.Context;
import com.amazonaws.services.lambda.runtime.RequestHandler;
public class RHJavaHandler implements RequestHandler<Request, Response> {
    @Override
    public Response handleRequest(Request input, Context context) {
        final Response response = new Response();
        response.setHello("Hello " + input.getFirstName() + " " + input.getLastName() +"!");
        return response;
    }
}
This does the same as the Java POJO example from above. When creating this function, we only need to specify the class name and can omit the function name: javahandler.RHJavanHandler
aws lambda create-function \
--function-name RHJavaHandler \
--runtime java8 \
--role arn:aws:iam::248689245702:role/basic_lambda_role \
--handler javahandler.RHJavaHandler \
--zip-file fileb://target/clojure-aws-lambda-0.1.0-SNAPSHOT-standalone.jar \
--region us-east-1
I’m skipping the test, re-use the command from above replacing the function name.
RequestHandler Clojure version
The straightforward solution in Clojure should be using the gen-class macro to implement the RequestHandler interface. Like this:
(ns clojurehandler.rh-clojure-handler
  (:import (javahandler Request Response)))
(gen-class
  :name "clojurehandler.RHClojureHandler"
  :implements [com.amazonaws.services.lambda.runtime.RequestHandler])
(defn -handleRequest [this request ctx]
  (Response. (str "Hello " (.getFirstName request) " " (.getLastName request) "!")))
Unfortunately, at the time of writing (and to my knowledge) Clojure does not handle concrete type parameter of generic interfaces. Though the code compiles fine, deploying and running results in following error message: Class clojurehandler.RHClojureHandler does not implement RequestHandler with concrete type parameter.
It seems we can’t follow this approach with Clojure. We could provide an implementation in Java with concrete type parameters and use that in Clojure, but this becomes again somewhat awkward (even more since solution 1.2 works in Clojure, we don’t need that interface). Let’s move on to the final approach, taking advantage of streaming.
2.2 RequestStreamHandler interface
package javahandler;

import com.amazonaws.services.lambda.runtime.Context;
import com.amazonaws.services.lambda.runtime.RequestStreamHandler;import java.io.IOException;
import java.io.InputStream;
import java.io.OutputStream;
import java.nio.charset.StandardCharsets;
import java.util.Scanner;

public class RSHJavaHandler implements RequestStreamHandler {
    @Override
    public void handleRequest(InputStream inputStream, OutputStream outputStream, Context context) throws IOException {
        String name;
        try (Scanner scanner = new Scanner(inputStream, StandardCharsets.UTF_8.name())) {            name = scanner.useDelimiter("\\A").next();
      }
        outputStream.write(("Hello " + name + "!").getBytes());
    }
}
This is the most flexible approach. We need to convert the inputstream and then write to the outputstream. Test this by sending the test input containing the string (string-input.txt, though this will contain the quotationmarks in the result).
If we want to send JSON we need to do the deserialisation in the function method.
RequestStreamHandler Clojure version
The Clojure version can be implemented straight away without issues:
(ns clojurehandler.rsh_clojure_handler
  (:require [clojure.java.io :as io]))
(gen-class
  :name "clojurehandler.RSHClojureHandler"
  :implements [com.amazonaws.services.lambda.runtime.RequestStreamHandler])
(defn -handleRequest [this input output ctx]
  (let [name (slurp input)]
    (with-open [o (io/writer output)]
      (.write o (str "Hello " name "!")))))
Summary
Using Clojure on AWS Lambda has its quirks. As demonstrated above, it is not always a straightforward process to replace Java with Clojure. The lacking support of concrete type parameters for generic interfaces and the immutability of types require some workarounds to use Clojure for implementing Lambda functions. The best ways are either implementing the RequestStreamHandler (2.2) or using the direct approach with standard (1.1) or custom types (1.2).
Taking all together, it feels slightly forced to use Clojure, making it a valid point to say that it might not (yet!) be the time to use it on AWS Lambda. Even less so that it seems necessary to allocate additional memory to execute the bytecode generated by the Clojure compiler, generating additional cost.
For now, a more practical approach is to implement Lambda functions in Java and keep the backend in Clojure.
References
Hyperledger - Build Your First Network - A walkthrough (video)
Links
- The tutorial: http://hyperledger-fabric.readthedocs.io/en/release-1.1/build_network.html
- Install the prerequisites: http://hyperledger-fabric.readthedocs.io/en/release-1.1/prereqs.html
Steps
If you’d like to follow the tutorial yourself, here are the commands to execute.
Installing the tools and downloading the samples
mkdir first-network-walkthrough
cd first-network-walkthrough
curl -sSL https://raw.githubusercontent.com/hyperledger/fabric/master/scripts/bootstrap.sh | bash -s 1.1.0
Run the script
In the same folder:
cd fabric-samples/first-network
export PATH=../bin:$PATH
./byfn.sh generate
./byfn.sh up
./byfn.sh down
Microservices tutorial building a web-scraper with Java, Python and RabbitMQ (updated)
Summary: A sample web scraping service demonstrating how to build a message driven application using RabbitMQ. The application consists of three parts: front-end developed in Knockout.js, that is communicating with a Spring Boot Java api, which in turn is offloading scraping tasks to a Python microservice.
Dear reader, I have created a course based on this course. If you enjoy the tutorial, you’ll love the class
Let's develop a message-driven microservices application
Learn how to build scalable applications using multiple frameworks and languages in one knowledge-packed crash course- Follow the complete development cycle when we go from idea to finished application.
- Learn the essentials of single-page frontends (Knockout.js), REST based backends (Java-Spring) and microservices (Python, RabbitMQ) in one compact course.
- Made for the busy developer. Ships with virtual machine image and tutor app so you can focus 100% on honing your coding skills.

- Installation & run
- Application architecture
- RabbitMQ in 5 Minutes
- Spring Boot Java API backend
- Python scraper
- Frontend
- The bookmark microservice in action
- Source code on Github
- The video course
- Thanks for reading
In this post, I’m going to show how to implement a message-driven application that consists of three independent parts. The application is a web scraping service that takes an URL and returns a text summary of the site.
This is an example that shows one advantage of the microservices1 pattern: it is easy to implement an independent part of an application in a programming language that is most suitable for the task at hand. It so happens that for Python exists a good website summary library, which we are going to use to extract a short summary of a website. The main backend functionality, however, is implemented in Java using Spring Boot (personally, I prefer using the JVM as the core of any application).
Tools and frameworks I use are:
- Spring Boot: REST, JPA, AMQP
- Gradle
- Java 8
- Python with Pika and sumy
- RabbitMQ
- Postgres
- Vagrant
- Knockout.js, Bootstrap, Node
This project is an enhancement of a previous project that implemented a bookmark web app: Rapid prototyping with Spring Data Rest and Knockout.js, by adding scraping functionality to the bookmark service. Because of this, I won’t repeat what I have already explained there (mainly the REST API, JPA persistence, CORS and the details of the knockout.js front-end). If interested, have a look at the post.
As usual, the project is available on Github2.
Installation & run
Using vagrant
I’m using Vagrant to install Postgres and RabbitMQ on a virtual machine. All you need to do is vagrant up (requires Virtualbox installed and some hard drive space for the image).
Note: if you want to get rid of the vagrant virtual machine, just run vagrant destroy.
Note: to make things easier, in application.properties the line spring.jpa.hibernate.ddl-auto=create allows us to automatically create the tables when starting up. However, this means all tables get erased with each new start. Change the line to spring.jpa.hibernate.ddl-auto=validate (after you have started up the backend at least once) to avoid data loss.
Running the application
To run the application, clone/fork the repository.
The project has three parts that are independently deployed and executed:
scraping-microservice-java-python-rabbitmq
├── java-api-backend
├── knockout-frontend
└── python-scraping-service
Vagrantfile
Start vagrant, and then each service separately:
$ cd scraping-microservice-java-python-rabbitmq

scraping-microservice-java-python-rabbitmq$ vagrant up
scraping-microservice-java-python-rabbitmq$ cd java-api-backend

java-api-backend$ gradle run
java-api-backend$ cd ../knockout-frontend

knockout-frontend$ python -m SimpleHTTPServer 8090
knockout-frontend$ cd ../python-scraping-service

python-scraping-service$ pip install -r requirements.txt
python-scraping-service$ python worker.py
Note: vagrant up takes a while the first time it’s executed. pip install -r requirements.txt is preferably done in a virtualenv3.
Also, for this post I’m using Python 2.
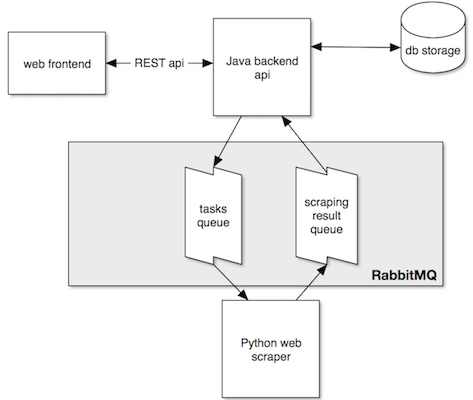
Application architecture
The following picture depicts how the main parts work together:
RabbitMQ in 5 Minutes
RabbitMQ is an open source “message broker” software that implements the Advanced Message Queuing Protocol (AMQP)4. The basic elements of AMQP are (quoting from RabbitMQ’s official documentation5):
- The producer is the sender of a message.
- The consumer is the receiver of a message. A consumer mostly waits to receive messages.
- A queue is the name for a mailbox. It lives inside RabbitMQ. Although messages flow through RabbitMQ and your applications, they can be stored only inside a queue. A queue is not bound by any limits, it can store as many messages as you like ‒ it’s essentially an infinite buffer. Many producers can send messages that go to one queue, many consumers can try to receive data from one queue.
- An exchange. The core idea in the messaging model in RabbitMQ is that the producer never sends any messages directly to a queue. Instead, the producer can only send messages to an exchange. It is a very simple thing: on one side it receives messages from producers and the other side it pushes them to queues. How it does this is defined by the exchange type. There are a few available: direct, topic, headers and fanout.
- A binding tells the exchange to what queue it should send messages to. Bindings can take an extra routing key parameter, the binding key. The meaning of a binding key depends on the exchange type. The fanout exchange, for example, simply ignores its value. A direct exchange a message goes to the queues whose binding key exactly matches the routing key of the message.
- Publishing a message in RabbitMQ therefore takes a routing key that an exchange uses to match corresponding queues.
Our application is going to use one special exchange that simplifies message routing: the default exchange. This is a nameless exchange that automatically routes messages to queues where the routing key of the message matches the binding
Spring Boot Java API backend
We start with the main api that the front-end communicates with and that is responsible for storing bookmarks and sending new tasks to the scraping service.
(As mentioned, I’m only going to explain how to implement RabbitMQ messaging in Spring. If you are interested to learn about the REST API and database (JPA) persistence part, I have blogged about how to rapidly develop a REST api using Spring data).
Spring has a boot starter module available for RabbitMQ6 org.springframework.boot:spring-boot-starter-amqp, which we add to our dependencies.
Spring Java-based configuration: main class
As usual for any Spring Boot application, most configurations are automatically setup depending on what dependencies are on the class path and what beans are found.
Every Spring boot application starts with @SpringBootApplication annotation, which is a convenience annotation that adds all of the following7:
@Configurationtags the class as a source of bean definitions for the application context.@EnableAutoConfigurationtells Spring Boot to start adding beans based on classpath settings, other beans, and various property settings.@ComponentScantells Spring to look for other components, configurations, and services in the same and sub-packages (because of that, it is recommended to put the main application class in the root package).- Depending on project dependency and bean definitions, further annotations will be added (e.g.
@EnableWebMvcfor a Spring MVC app whenspring-webmvcis on the classpath).
The starting point of the backend API is, therefore, the base class with our main method:
@SpringBootApplication
public class ScraperApiApplication
{

    public static void main(String[] args)
    {
        SpringApplication.run(ScraperApiApplication.class, args);
    }

    // ... more bean definitions
}
From there, Spring searches for further @Configuration annotated classes.
(By the way, there is no XML configuration to be found whatsoever in this project. Spring Boot prefers (and I too) Java-based configuration8, even though it is possible to mix the two.)
Task producer
As shown in the architecture picture above, the API backend is a producer of tasks that the scraper is consuming. Let’s start with the producer configuration. It extends the RabbitMqConfiguration which we are going to re-use later for the consumer part:
@Configuration
public class TaskProducerConfiguration extends RabbitMqConfiguration
{
    protected final String tasksQueue = "tasks.queue";

    @Bean
    public RabbitTemplate rabbitTemplate()
    {
        RabbitTemplate template = new RabbitTemplate(connectionFactory());
        template.setRoutingKey(this.tasksQueue);
        template.setQueue(this.tasksQueue);
        template.setMessageConverter(jsonMessageConverter());
        return template;
    }

    @Bean
    public Queue tasksQueue()
    {
        return new Queue(this.tasksQueue);
    }
}

@Configuration
public class RabbitMqConfiguration
{
    @Bean
    public ConnectionFactory connectionFactory()
    {
        CachingConnectionFactory connectionFactory = new CachingConnectionFactory("192.168.22.10");
        connectionFactory.setUsername("user");
        connectionFactory.setPassword("password");
        return connectionFactory;
    }

    @Bean
    public AmqpAdmin amqpAdmin()
    {
        return new RabbitAdmin(connectionFactory());
    }


    @Bean
    public MessageConverter jsonMessageConverter()
    {
        return new Jackson2JsonMessageConverter();
    }
}
We also define a MessageConverter and return a JSON based converter. With this, the messages we send to the queues are automatically converted to Json messages. This allows us to exchange simple Java “POJOs” (that are serialized into JSON) between our services.
The actual sending of messages is done with the configured RabbitTemplate. We implement a simple class that does the sending:
@Component
public class TaskProducer
{
    @Autowired
    private TaskProducerConfiguration taskProducerConfiguration;

    public void sendNewTask(TaskMessage taskMessage)
    {
    taskProducerConfiguration.rabbitTemplate()
                .convertAndSend(taskProducerConfiguration.tasksQueue, taskMessage);
    }

}
Now you might be wondering:
So what about exchanges, queues, bindings??
It’s all been defined already, mostly implicitly. We don’t explicitly define an exchange, so per default, we are using the defaultDirectExchange (see above). Same with binding, as we don’t say anything the default binding is being used (matching router key with binding key). We only define the queue. In convertAndSend(taskProducerConfiguration.tasksQueue, taskMessage) we use the name of the queue as routing key so the default direct exchange sends the message to the queue of the same name. That’s all we have to configure to make messaging work.
ScrapingResult consumer
Looking back at the architecture picture, we see that the api is also a consumer of the ScrapingResult queue. Again we base the consumer configuration on RabbitMqConfiguration
@Configuration
public class ScrapingResultConsumerConfiguration extends RabbitMqConfiguration
{
    protected final String scrapingResultQueue = "scrapingresult.queue";

    @Autowired
    private ScrapingResultHandler scrapingResultHandler;

    @Bean
    public RabbitTemplate rabbitTemplate() {
        RabbitTemplate template = new RabbitTemplate(connectionFactory());
        template.setRoutingKey(this.scrapingResultQueue);
        template.setQueue(this.scrapingResultQueue);
        template.setMessageConverter(jsonMessageConverter());
        return template;
    }

    @Bean
    public Queue scrapingResultQueue() {
        return new Queue(this.scrapingResultQueue);
    }

    @Bean
    public SimpleMessageListenerContainer listenerContainer() {
        SimpleMessageListenerContainer container = new SimpleMessageListenerContainer();
        container.setConnectionFactory(connectionFactory());
        container.setQueueNames(this.scrapingResultQueue);
        container.setMessageListener(messageListenerAdapter());
        return container;
    }

    @Bean
    public MessageListenerAdapter messageListenerAdapter() {
        return new MessageListenerAdapter(scrapingResultHandler, jsonMessageConverter());
    }
}
The template and queue definition is almost the same except a different name. A consumer is not actively sending something but waiting to receive a message. Therefore, we define message listener. To do that in Spring, we define a MessageListenerAdapter bean that we add to a SimpleMessageListenerContainer. The actual listener implementation is again a simple Java POJO class:
@Component
public class ScrapingResultHandler
{
    public void handleMessage(ScrapingResultMessage scrapingResultMessage)
    {
        System.out.println("Received summary: " + scrapingResultMessage.getSummary());
        final String url = scrapingResultMessage.getUrl();
        final List<Bookmark> bookmarks = bookmarkRepository.findByUrl(url);
        if (bookmarks.size() == 0)
        {
            System.out.println("No bookmark of url: " + url + " found.");
        }
        else
        {
            for (Bookmark bookmark : bookmarks)
            {
                bookmark.setSummary(scrapingResultMessage.getSummary());
                bookmarkRepository.save(bookmarks);
                System.out.println("updated bookmark: " + url);
            }
        }
    }
}
In that listener, we get the summary from the message and update the bookmarks for that URL.
Json message converter type
One question remains: how does the JSON message converter know that it has to deserialize the message it received from RabbitMQ into scraper.api.amqp.ScrapingResultMessage? This is normally accomplished by setting a header of the message: __TypeId__ = "scraper.api.amqp.ScrapingResultMessage". This is fine if only Java services communicate with each other. But in our case we want completely independent parts, the Python scraper should not know anything about how the Java API backend consumes messages. For this, we override the default behavior by providing a ClassMapper in the RabbitMQ configuration:
    @Bean
    public MessageConverter jsonMessageConverter()
    {
        final Jackson2JsonMessageConverter converter = new Jackson2JsonMessageConverter();
        converter.setClassMapper(classMapper());
        return converter;
    }

    @Bean
    public DefaultClassMapper classMapper()
    {
        DefaultClassMapper typeMapper = new DefaultClassMapper();
        typeMapper.setDefaultType(ScrapingResultMessage.class);
        return typeMapper;
    }
With typeMapper.setDefaultType(ScrapingResultMessage.class); we tell Spring that all messages we expect to consume are of type scraper.api.amqp.ScrapingResultMessage. We set this to be true for the whole application because that is all we consume. Later we might want to move that into a specific consumer configuration (e.g. ScrapingResultConsumerConfiguration).
Testing the API backend
That’s all for the Java API part. Cd into the project and run gradle run. The api connects to to Rabbit Mq and Postgres. Test the api by sending JSON requests to it (as explained in the previous post. Adding a bookmark will also send a new message to RabbitMQ.
java-api-backend$ http :8080/
{
    "_embedded": {},
    "_links": {
        "bookmarks": {
            "href": "http://localhost:8080/bookmarks",
            "templated": false
        },
        "profile": {
            "href": "http://localhost:8080/alps",
            "templated": false
        }
    }
}

java-api-backend$ http POST :8080/bookmarks url=www.yahoo.com
HTTP/1.1 201 Created

java-api-backend$ http :8080/bookmarks
{
    "_embedded": {
        "bookmarks": [
            {
                "_embedded": {},
                "_links": {
                    "self": {
                        "href": "http://localhost:8080/bookmarks/1",
                        "templated": false
                    }
                },
                "created": "2015-08-06T14:00:08.574+0000",
                "summary": null,
                "url": "www.yahoo.com"
            }
    ...
}
The RabbitMQ web admin interface is available at: http://192.168.22.10:15672/. Login with “root” “root” and under “Queues” > “Get messages” you can query the new message:
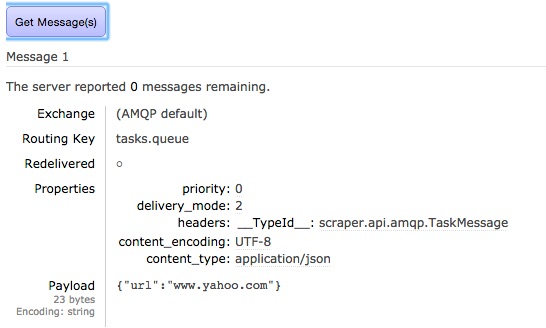
(note the __TypeId__ header, see above).
We can also test the consumer. Create a message in RabbitMQ web admin. Select the queue and select “publish message”. Enter following:
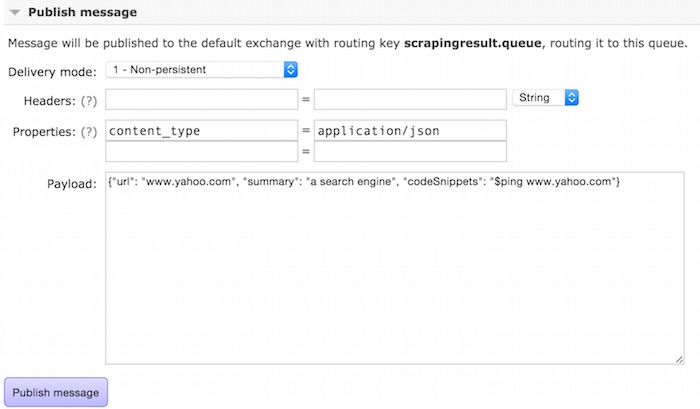
The log of the backend will show something like that:
Received unit: a search engine
...
Hibernate: update bookmark set created=?, summary=?, url=? where id=?
updated bookmark: www.yahoo.com
Using REST api:
$ http :8080/bookmarks
{
    "_embedded": {
        "bookmarks": [
            {
                "_embedded": {},
                "_links": {
                    "self": {
                        "href": "http://localhost:8080/bookmarks/1",
                        "templated": false
                    }
                },
                "created": "2015-08-07T08:41:45.458+0000",
                "summary": "a search engine",
                "url": "www.yahoo.com"
            }
        ]
    },
    "_links": {
        "search": {
            "href": "http://localhost:8080/bookmarks/search",
            "templated": false
        }
    }
}
Now let’s get polyglot and continue with the Python scraper service.
Python scraper
The RabbitMQ part is simpler to implement in Python. The RabbitMQ home page has a nice set of tutorials if you want to learn more. We use Pika as our binding to RabbitMQ.
import pika
import json
from scraper import Scraper

credentials = pika.PlainCredentials("user", "password")
parameters = pika.ConnectionParameters(host='192.168.22.10', credentials=credentials)

connection = pika.BlockingConnection(parameters)
channel = connection.channel()
tasks_queue = channel.queue_declare(queue='tasks.queue', durable=True)
scraping_result_queue = channel.queue_declare(queue='scrapingresult.queue', durable=True)

print ' [*] Waiting for tasks. To exit press CTRL+C'

def publish_result(scraping_result):
    j = json.dumps(scraping_result.__dict__)
    properties = pika.BasicProperties(content_type="application/json")
    channel.basic_publish(exchange='', routing_key='scrapingresult.queue', body=j, properties=properties)

def callback(ch, method, properties, body):
    url = json.loads(body)['url']
    scraper = Scraper()
    result = scraper.scrape(url)
    publish_result(result)

channel.basic_consume(callback, queue='tasks.queue', no_ack=True)
channel.start_consuming()
We create the two queues and wait for the task queue to send us a message to consume. The callback method receives the JSON body which we deserialize using json package. We send the url to our scraper and produce a message in the scrapingresult.queue queue.
For the actual scraping of a website’s summary, we use https://github.com/miso-belica/sumy library. Please see their docs (especially as it requires to have nltk installed on your system).
class ScrapingResult:
    def __init__(self):
        self.url = None
        self.summary = None

LANGUAGE = "english"
SENTENCES_COUNT = 2

class Scraper:

    def scrape(self, url):
        complete_url = url
        try:
            # get summary
            print "Retrieving page summary of %s... " % url

            parser = HtmlParser.from_url(complete_url, Tokenizer(LANGUAGE))
            stemmer = Stemmer(LANGUAGE)

            summarizer = Summarizer(stemmer)
            summarizer.stop_words = get_stop_words(LANGUAGE)

            url_summary = ''.join(str(sentence) for sentence in summarizer(parser.document, SENTENCES_COUNT))

        except Exception, e:
            url_summary = "Could not scrape summary. Reason: %s" % e.message

        print "Done: %s = %s" % (url, url_summary)

        # create scraping result
        scraping_result = ScrapingResult()

        scraping_result.summary = url_summary
        scraping_result.url = url

        return scraping_result
The scraper is not doing much except using the sumy library and returning the result.
To run the python scraper, install requirements.txt (preferably in a virtualenv) and then simply run worker.py:
(venv)python-scraping-service$ python worker.py
Frontend
For the frontend we re-use the Knockout.js project from the previous post and basically just add a new field for the summary part.
To start the frontend we use the SimpleHTTPServer from Python. We need to choose another port as 8080 is already taken by the backend API.
knockout-frontend$ python -m SimpleHTTPServer 8090
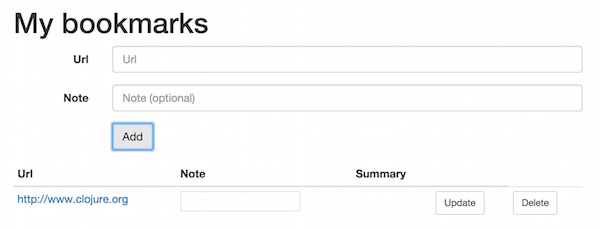
The bookmark microservice in action
Now we can add bookmarks and observe the processing in the logs:
Backend log:
Hibernate: select nextval ('hibernate_sequence')
Hibernate: insert into bookmark (created, note, summary, url, id) values (?, ?, ?, ?, ?)
That sends a message to the queue that gets picked up and processed by the scraper:
Retrieving page summary of http://www.clojure.org ...
Done: http://www.clojure.org  = It is designed to be a general-purpose language, ...
On the backend, the listener receives the result message and updates the bookmark
Hibernate: select bookmark0_.id as id1_0_, bookmark0_.created as created2_0_, bookmark0_.note as note3_0_, bookmark0_.summary as summary4_0_, bookmark0_.url as url5_0_ from bookmark bookmark0_
Received summary: It is designed to be a general-purpose language....
...
Hibernate: update bookmark set created=?, note=?, summary=?, url=? where id=?
updated bookmark: http://www.clojure.org
On the frontend we refresh the website and get:
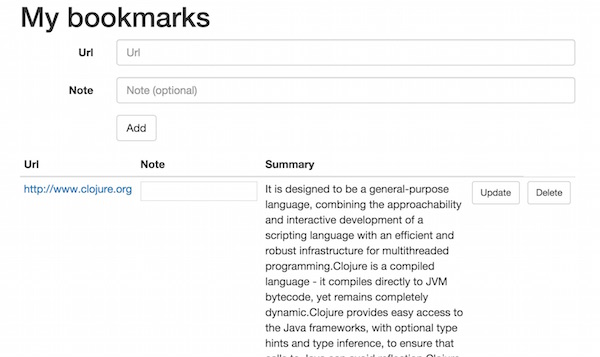
(In a real-world application, we would need to push the updated info to the client (using web sockets for example). For our prototype we skip this (this post has already become quite long) and require the user to hit refresh.)
Source code on Github
Check out the source code on Github.
The video course
Let's develop a message-driven microservices application
Learn how to build scalable applications using multiple frameworks and languages in one knowledge-packed crash course- Follow the complete development cycle when we go from idea to finished application.
- Learn the essentials of single-page frontends (Knockout.js), REST based backends (Java-Spring) and microservices (Python, RabbitMQ) in one compact course.
- Made for the busy developer. Ships with virtual machine image and tutor app so you can focus 100% on honing your coding skills.
Thanks for reading
I hope you enjoyed reading this post. If you have comments, questions or found a bug please let me know, either in the comments below or contact me directly.