Summary: A sample web scraping service demonstrating how to build a message driven application using RabbitMQ. The application consists of three parts: front-end developed in Knockout.js, that is communicating with a Spring Boot Java api, which in turn is offloading scraping tasks to a Python microservice.
Dear reader, I have created a course based on this course. If you enjoy the tutorial, you’ll love the class
Let's develop a message-driven microservices application
Learn how to build scalable applications using multiple frameworks and languages in one knowledge-packed crash course- Follow the complete development cycle when we go from idea to finished application.
- Learn the essentials of single-page frontends (Knockout.js), REST based backends (Java-Spring) and microservices (Python, RabbitMQ) in one compact course.
- Made for the busy developer. Ships with virtual machine image and tutor app so you can focus 100% on honing your coding skills.
- Installation & run
- Application architecture
- RabbitMQ in 5 Minutes
- Spring Boot Java API backend
- Python scraper
- Frontend
- The bookmark microservice in action
- Source code on Github
- The video course
- Thanks for reading
In this post, I’m going to show how to implement a message-driven application that consists of three independent parts. The application is a web scraping service that takes an URL and returns a text summary of the site.
This is an example that shows one advantage of the microservices1 pattern: it is easy to implement an independent part of an application in a programming language that is most suitable for the task at hand. It so happens that for Python exists a good website summary library, which we are going to use to extract a short summary of a website. The main backend functionality, however, is implemented in Java using Spring Boot (personally, I prefer using the JVM as the core of any application).
Tools and frameworks I use are:
- Spring Boot: REST, JPA, AMQP
- Gradle
- Java 8
- Python with Pika and sumy
- RabbitMQ
- Postgres
- Vagrant
- Knockout.js, Bootstrap, Node
This project is an enhancement of a previous project that implemented a bookmark web app: Rapid prototyping with Spring Data Rest and Knockout.js, by adding scraping functionality to the bookmark service. Because of this, I won’t repeat what I have already explained there (mainly the REST API, JPA persistence, CORS and the details of the knockout.js front-end). If interested, have a look at the post.
As usual, the project is available on Github2.
Installation & run
Using vagrant
I’m using Vagrant to install Postgres and RabbitMQ on a virtual machine. All you need to do is vagrant up (requires Virtualbox installed and some hard drive space for the image).
Note: if you want to get rid of the vagrant virtual machine, just run vagrant destroy.
Note: to make things easier, in application.properties the line spring.jpa.hibernate.ddl-auto=create allows us to automatically create the tables when starting up. However, this means all tables get erased with each new start. Change the line to spring.jpa.hibernate.ddl-auto=validate (after you have started up the backend at least once) to avoid data loss.
Running the application
To run the application, clone/fork the repository.
The project has three parts that are independently deployed and executed:
scraping-microservice-java-python-rabbitmq
├── java-api-backend
├── knockout-frontend
└── python-scraping-service
Vagrantfile
Start vagrant, and then each service separately:
$ cd scraping-microservice-java-python-rabbitmq

scraping-microservice-java-python-rabbitmq$ vagrant up
scraping-microservice-java-python-rabbitmq$ cd java-api-backend

java-api-backend$ gradle run
java-api-backend$ cd ../knockout-frontend

knockout-frontend$ python -m SimpleHTTPServer 8090
knockout-frontend$ cd ../python-scraping-service

python-scraping-service$ pip install -r requirements.txt
python-scraping-service$ python worker.py
Note: vagrant up takes a while the first time it’s executed. pip install -r requirements.txt is preferably done in a virtualenv3.
Also, for this post I’m using Python 2.
Application architecture
The following picture depicts how the main parts work together:
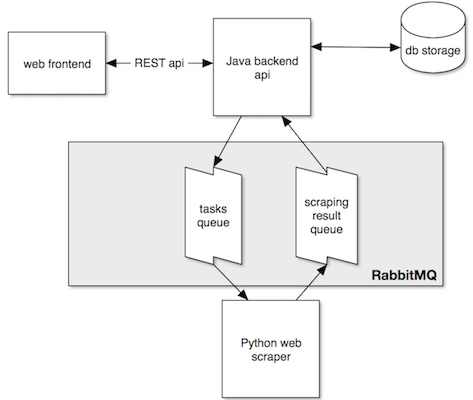
RabbitMQ in 5 Minutes
RabbitMQ is an open source “message broker” software that implements the Advanced Message Queuing Protocol (AMQP)4. The basic elements of AMQP are (quoting from RabbitMQ’s official documentation5):
- The producer is the sender of a message.
- The consumer is the receiver of a message. A consumer mostly waits to receive messages.
- A queue is the name for a mailbox. It lives inside RabbitMQ. Although messages flow through RabbitMQ and your applications, they can be stored only inside a queue. A queue is not bound by any limits, it can store as many messages as you like ‒ it’s essentially an infinite buffer. Many producers can send messages that go to one queue, many consumers can try to receive data from one queue.
- An exchange. The core idea in the messaging model in RabbitMQ is that the producer never sends any messages directly to a queue. Instead, the producer can only send messages to an exchange. It is a very simple thing: on one side it receives messages from producers and the other side it pushes them to queues. How it does this is defined by the exchange type. There are a few available: direct, topic, headers and fanout.
- A binding tells the exchange to what queue it should send messages to. Bindings can take an extra routing key parameter, the binding key. The meaning of a binding key depends on the exchange type. The fanout exchange, for example, simply ignores its value. A direct exchange a message goes to the queues whose binding key exactly matches the routing key of the message.
- Publishing a message in RabbitMQ therefore takes a routing key that an exchange uses to match corresponding queues.
Our application is going to use one special exchange that simplifies message routing: the default exchange. This is a nameless exchange that automatically routes messages to queues where the routing key of the message matches the binding
Spring Boot Java API backend
We start with the main api that the front-end communicates with and that is responsible for storing bookmarks and sending new tasks to the scraping service.
(As mentioned, I’m only going to explain how to implement RabbitMQ messaging in Spring. If you are interested to learn about the REST API and database (JPA) persistence part, I have blogged about how to rapidly develop a REST api using Spring data).
Spring has a boot starter module available for RabbitMQ6 org.springframework.boot:spring-boot-starter-amqp, which we add to our dependencies.
Spring Java-based configuration: main class
As usual for any Spring Boot application, most configurations are automatically setup depending on what dependencies are on the class path and what beans are found.
Every Spring boot application starts with @SpringBootApplication annotation, which is a convenience annotation that adds all of the following7:
@Configurationtags the class as a source of bean definitions for the application context.@EnableAutoConfigurationtells Spring Boot to start adding beans based on classpath settings, other beans, and various property settings.@ComponentScantells Spring to look for other components, configurations, and services in the same and sub-packages (because of that, it is recommended to put the main application class in the root package).- Depending on project dependency and bean definitions, further annotations will be added (e.g.
@EnableWebMvcfor a Spring MVC app whenspring-webmvcis on the classpath).
The starting point of the backend API is, therefore, the base class with our main method:
@SpringBootApplication
public class ScraperApiApplication
{

    public static void main(String[] args)
    {
        SpringApplication.run(ScraperApiApplication.class, args);
    }

    // ... more bean definitions
}
From there, Spring searches for further @Configuration annotated classes.
(By the way, there is no XML configuration to be found whatsoever in this project. Spring Boot prefers (and I too) Java-based configuration8, even though it is possible to mix the two.)
Task producer
As shown in the architecture picture above, the API backend is a producer of tasks that the scraper is consuming. Let’s start with the producer configuration. It extends the RabbitMqConfiguration which we are going to re-use later for the consumer part:
@Configuration
public class TaskProducerConfiguration extends RabbitMqConfiguration
{
    protected final String tasksQueue = "tasks.queue";

    @Bean
    public RabbitTemplate rabbitTemplate()
    {
        RabbitTemplate template = new RabbitTemplate(connectionFactory());
        template.setRoutingKey(this.tasksQueue);
        template.setQueue(this.tasksQueue);
        template.setMessageConverter(jsonMessageConverter());
        return template;
    }

    @Bean
    public Queue tasksQueue()
    {
        return new Queue(this.tasksQueue);
    }
}

@Configuration
public class RabbitMqConfiguration
{
    @Bean
    public ConnectionFactory connectionFactory()
    {
        CachingConnectionFactory connectionFactory = new CachingConnectionFactory("192.168.22.10");
        connectionFactory.setUsername("user");
        connectionFactory.setPassword("password");
        return connectionFactory;
    }

    @Bean
    public AmqpAdmin amqpAdmin()
    {
        return new RabbitAdmin(connectionFactory());
    }


    @Bean
    public MessageConverter jsonMessageConverter()
    {
        return new Jackson2JsonMessageConverter();
    }
}
We also define a MessageConverter and return a JSON based converter. With this, the messages we send to the queues are automatically converted to Json messages. This allows us to exchange simple Java “POJOs” (that are serialized into JSON) between our services.
The actual sending of messages is done with the configured RabbitTemplate. We implement a simple class that does the sending:
@Component
public class TaskProducer
{
    @Autowired
    private TaskProducerConfiguration taskProducerConfiguration;

    public void sendNewTask(TaskMessage taskMessage)
    {
    taskProducerConfiguration.rabbitTemplate()
                .convertAndSend(taskProducerConfiguration.tasksQueue, taskMessage);
    }

}
Now you might be wondering:
So what about exchanges, queues, bindings??
It’s all been defined already, mostly implicitly. We don’t explicitly define an exchange, so per default, we are using the defaultDirectExchange (see above). Same with binding, as we don’t say anything the default binding is being used (matching router key with binding key). We only define the queue. In convertAndSend(taskProducerConfiguration.tasksQueue, taskMessage) we use the name of the queue as routing key so the default direct exchange sends the message to the queue of the same name. That’s all we have to configure to make messaging work.
ScrapingResult consumer
Looking back at the architecture picture, we see that the api is also a consumer of the ScrapingResult queue. Again we base the consumer configuration on RabbitMqConfiguration
@Configuration
public class ScrapingResultConsumerConfiguration extends RabbitMqConfiguration
{
    protected final String scrapingResultQueue = "scrapingresult.queue";

    @Autowired
    private ScrapingResultHandler scrapingResultHandler;

    @Bean
    public RabbitTemplate rabbitTemplate() {
        RabbitTemplate template = new RabbitTemplate(connectionFactory());
        template.setRoutingKey(this.scrapingResultQueue);
        template.setQueue(this.scrapingResultQueue);
        template.setMessageConverter(jsonMessageConverter());
        return template;
    }

    @Bean
    public Queue scrapingResultQueue() {
        return new Queue(this.scrapingResultQueue);
    }

    @Bean
    public SimpleMessageListenerContainer listenerContainer() {
        SimpleMessageListenerContainer container = new SimpleMessageListenerContainer();
        container.setConnectionFactory(connectionFactory());
        container.setQueueNames(this.scrapingResultQueue);
        container.setMessageListener(messageListenerAdapter());
        return container;
    }

    @Bean
    public MessageListenerAdapter messageListenerAdapter() {
        return new MessageListenerAdapter(scrapingResultHandler, jsonMessageConverter());
    }
}
The template and queue definition is almost the same except a different name. A consumer is not actively sending something but waiting to receive a message. Therefore, we define message listener. To do that in Spring, we define a MessageListenerAdapter bean that we add to a SimpleMessageListenerContainer. The actual listener implementation is again a simple Java POJO class:
@Component
public class ScrapingResultHandler
{
    public void handleMessage(ScrapingResultMessage scrapingResultMessage)
    {
        System.out.println("Received summary: " + scrapingResultMessage.getSummary());
        final String url = scrapingResultMessage.getUrl();
        final List<Bookmark> bookmarks = bookmarkRepository.findByUrl(url);
        if (bookmarks.size() == 0)
        {
            System.out.println("No bookmark of url: " + url + " found.");
        }
        else
        {
            for (Bookmark bookmark : bookmarks)
            {
                bookmark.setSummary(scrapingResultMessage.getSummary());
                bookmarkRepository.save(bookmarks);
                System.out.println("updated bookmark: " + url);
            }
        }
    }
}
In that listener, we get the summary from the message and update the bookmarks for that URL.
Json message converter type
One question remains: how does the JSON message converter know that it has to deserialize the message it received from RabbitMQ into scraper.api.amqp.ScrapingResultMessage? This is normally accomplished by setting a header of the message: __TypeId__ = "scraper.api.amqp.ScrapingResultMessage". This is fine if only Java services communicate with each other. But in our case we want completely independent parts, the Python scraper should not know anything about how the Java API backend consumes messages. For this, we override the default behavior by providing a ClassMapper in the RabbitMQ configuration:
    @Bean
    public MessageConverter jsonMessageConverter()
    {
        final Jackson2JsonMessageConverter converter = new Jackson2JsonMessageConverter();
        converter.setClassMapper(classMapper());
        return converter;
    }

    @Bean
    public DefaultClassMapper classMapper()
    {
        DefaultClassMapper typeMapper = new DefaultClassMapper();
        typeMapper.setDefaultType(ScrapingResultMessage.class);
        return typeMapper;
    }
With typeMapper.setDefaultType(ScrapingResultMessage.class); we tell Spring that all messages we expect to consume are of type scraper.api.amqp.ScrapingResultMessage. We set this to be true for the whole application because that is all we consume. Later we might want to move that into a specific consumer configuration (e.g. ScrapingResultConsumerConfiguration).
Testing the API backend
That’s all for the Java API part. Cd into the project and run gradle run. The api connects to to Rabbit Mq and Postgres. Test the api by sending JSON requests to it (as explained in the previous post. Adding a bookmark will also send a new message to RabbitMQ.
java-api-backend$ http :8080/
{
    "_embedded": {},
    "_links": {
        "bookmarks": {
            "href": "http://localhost:8080/bookmarks",
            "templated": false
        },
        "profile": {
            "href": "http://localhost:8080/alps",
            "templated": false
        }
    }
}

java-api-backend$ http POST :8080/bookmarks url=www.yahoo.com
HTTP/1.1 201 Created

java-api-backend$ http :8080/bookmarks
{
    "_embedded": {
        "bookmarks": [
            {
                "_embedded": {},
                "_links": {
                    "self": {
                        "href": "http://localhost:8080/bookmarks/1",
                        "templated": false
                    }
                },
                "created": "2015-08-06T14:00:08.574+0000",
                "summary": null,
                "url": "www.yahoo.com"
            }
    ...
}
The RabbitMQ web admin interface is available at: http://192.168.22.10:15672/. Login with “root” “root” and under “Queues” > “Get messages” you can query the new message:
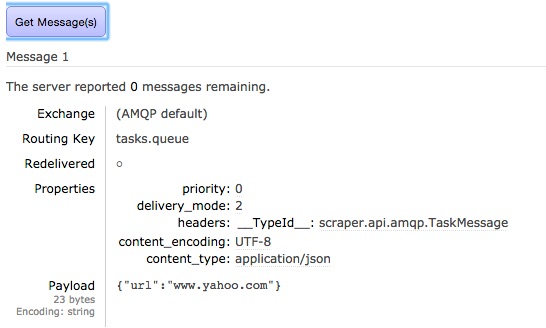
(note the __TypeId__ header, see above).
We can also test the consumer. Create a message in RabbitMQ web admin. Select the queue and select “publish message”. Enter following:
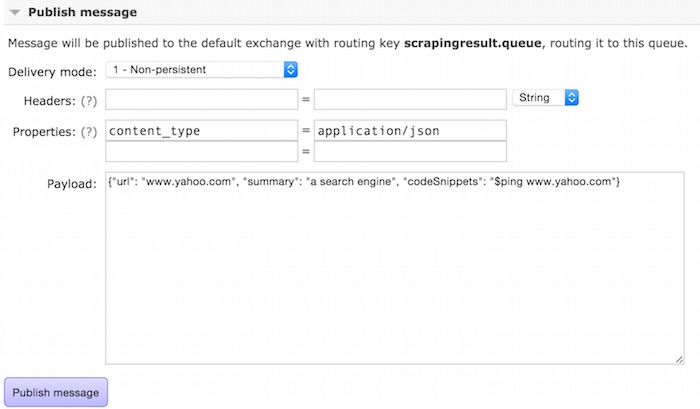
The log of the backend will show something like that:
Received unit: a search engine
...
Hibernate: update bookmark set created=?, summary=?, url=? where id=?
updated bookmark: www.yahoo.com
Using REST api:
$ http :8080/bookmarks
{
    "_embedded": {
        "bookmarks": [
            {
                "_embedded": {},
                "_links": {
                    "self": {
                        "href": "http://localhost:8080/bookmarks/1",
                        "templated": false
                    }
                },
                "created": "2015-08-07T08:41:45.458+0000",
                "summary": "a search engine",
                "url": "www.yahoo.com"
            }
        ]
    },
    "_links": {
        "search": {
            "href": "http://localhost:8080/bookmarks/search",
            "templated": false
        }
    }
}
Now let’s get polyglot and continue with the Python scraper service.
Python scraper
The RabbitMQ part is simpler to implement in Python. The RabbitMQ home page has a nice set of tutorials if you want to learn more. We use Pika as our binding to RabbitMQ.
import pika
import json
from scraper import Scraper

credentials = pika.PlainCredentials("user", "password")
parameters = pika.ConnectionParameters(host='192.168.22.10', credentials=credentials)

connection = pika.BlockingConnection(parameters)
channel = connection.channel()
tasks_queue = channel.queue_declare(queue='tasks.queue', durable=True)
scraping_result_queue = channel.queue_declare(queue='scrapingresult.queue', durable=True)

print ' [*] Waiting for tasks. To exit press CTRL+C'

def publish_result(scraping_result):
    j = json.dumps(scraping_result.__dict__)
    properties = pika.BasicProperties(content_type="application/json")
    channel.basic_publish(exchange='', routing_key='scrapingresult.queue', body=j, properties=properties)

def callback(ch, method, properties, body):
    url = json.loads(body)['url']
    scraper = Scraper()
    result = scraper.scrape(url)
    publish_result(result)

channel.basic_consume(callback, queue='tasks.queue', no_ack=True)
channel.start_consuming()
We create the two queues and wait for the task queue to send us a message to consume. The callback method receives the JSON body which we deserialize using json package. We send the url to our scraper and produce a message in the scrapingresult.queue queue.
For the actual scraping of a website’s summary, we use https://github.com/miso-belica/sumy library. Please see their docs (especially as it requires to have nltk installed on your system).
class ScrapingResult:
    def __init__(self):
        self.url = None
        self.summary = None

LANGUAGE = "english"
SENTENCES_COUNT = 2

class Scraper:

    def scrape(self, url):
        complete_url = url
        try:
            # get summary
            print "Retrieving page summary of %s... " % url

            parser = HtmlParser.from_url(complete_url, Tokenizer(LANGUAGE))
            stemmer = Stemmer(LANGUAGE)

            summarizer = Summarizer(stemmer)
            summarizer.stop_words = get_stop_words(LANGUAGE)

            url_summary = ''.join(str(sentence) for sentence in summarizer(parser.document, SENTENCES_COUNT))

        except Exception, e:
            url_summary = "Could not scrape summary. Reason: %s" % e.message

        print "Done: %s = %s" % (url, url_summary)

        # create scraping result
        scraping_result = ScrapingResult()

        scraping_result.summary = url_summary
        scraping_result.url = url

        return scraping_result
The scraper is not doing much except using the sumy library and returning the result.
To run the python scraper, install requirements.txt (preferably in a virtualenv) and then simply run worker.py:
(venv)python-scraping-service$ python worker.py
Frontend
For the frontend we re-use the Knockout.js project from the previous post and basically just add a new field for the summary part.
To start the frontend we use the SimpleHTTPServer from Python. We need to choose another port as 8080 is already taken by the backend API.
knockout-frontend$ python -m SimpleHTTPServer 8090
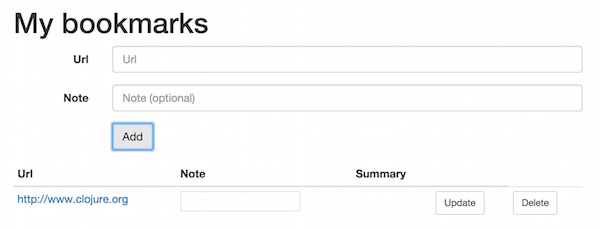
The bookmark microservice in action
Now we can add bookmarks and observe the processing in the logs:
Backend log:
Hibernate: select nextval ('hibernate_sequence')
Hibernate: insert into bookmark (created, note, summary, url, id) values (?, ?, ?, ?, ?)
That sends a message to the queue that gets picked up and processed by the scraper:
Retrieving page summary of http://www.clojure.org ...
Done: http://www.clojure.org  = It is designed to be a general-purpose language, ...
On the backend, the listener receives the result message and updates the bookmark
Hibernate: select bookmark0_.id as id1_0_, bookmark0_.created as created2_0_, bookmark0_.note as note3_0_, bookmark0_.summary as summary4_0_, bookmark0_.url as url5_0_ from bookmark bookmark0_
Received summary: It is designed to be a general-purpose language....
...
Hibernate: update bookmark set created=?, note=?, summary=?, url=? where id=?
updated bookmark: http://www.clojure.org
On the frontend we refresh the website and get:
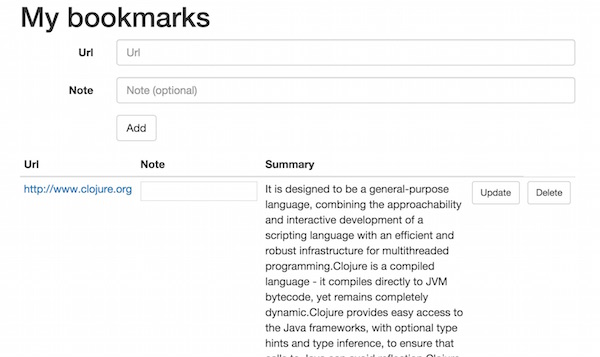
(In a real-world application, we would need to push the updated info to the client (using web sockets for example). For our prototype we skip this (this post has already become quite long) and require the user to hit refresh.)
Source code on Github
Check out the source code on Github.
The video course
Let's develop a message-driven microservices application
Learn how to build scalable applications using multiple frameworks and languages in one knowledge-packed crash course- Follow the complete development cycle when we go from idea to finished application.
- Learn the essentials of single-page frontends (Knockout.js), REST based backends (Java-Spring) and microservices (Python, RabbitMQ) in one compact course.
- Made for the busy developer. Ships with virtual machine image and tutor app so you can focus 100% on honing your coding skills.
Thanks for reading
I hope you enjoyed reading this post. If you have comments, questions or found a bug please let me know, either in the comments below or contact me directly.